viem TypeScript Ethereum Library
Introduction
viem is a modular TypeScript library that allows developers to interact with abstractions over the JSON-RPC API, making it easy to interact with Ethereum nodes. Since Tanssi-powered EVM networks have an Ethereum API available that is fully compatible with Ethereum-style JSON-RPC invocations, developers can leverage this compatibility to interact with any Tanssi EVM network. For more information on viem, check out their documentation site.
In this guide, you'll learn how to use viem to send a transaction and deploy a contract on the demo EVM network. This guide can be adapted for use with any Tanssi-powered EVM network.
Note
The examples in this guide are based on a MacOS or Ubuntu 20.04 environment. If you're using Windows, you'll need to adapt them accordingly.
Furthermore, please ensure that you have Node.js and a package manager (such as npm or yarn) installed. To learn how to install Node.js, please check their official documentation.
Also, make sure you've initialized a package.json file for ES6 modules. You can initialize a default package.json file using npm by running the following command npm init --yes.
Checking Prerequisites
For the examples in this guide, you will need to have the following:
- An account with funds in the Tanssi EVM network you are testing with
Installing viem
To get started, you'll need to create a basic TypeScript project. First, create a directory to store all of the files you'll be creating throughout this guide, and initialize the project with the following command:
mkdir viem-examples && cd viem-examples && npm init --y
For this guide, you'll need to install the viem library and the Solidity compiler. To install both packages, you can run the following command:
npm install typescript ts-node viem solc@0.8.0
yarn add typescript ts-node viem solc@0.8.0
You can create a TypeScript configuration file by running:
npx tsc --init
Note
This tutorial was created using Node.js v18.18.0.
Set Up a viem Client (Provider)
Throughout this guide, you'll be creating a bunch of scripts that provide different functionality, such as sending a transaction, deploying a contract, and interacting with a deployed contract. In most of these scripts, you'll need to create a viem client to interact with the network.
You can create a viem client for reading chain data, like balances or contract data, using the createPublicClient function, or you can create a viem client for writing chain data, like sending transactions, using the createWalletClient function.
Creating a viem client to interact with your Tanssi EVM network is a two-step process. First, you'll need to import the defineChain function from viem. This will allow you to specify the details of your Tanssi EVM network (or any arbitrary EVM chain). You'll then need to provide all of the chain details, as shown in the next section.
For Reading Chain Data
To create a client for reading chain data, you can take the following steps:
- Import the
createPublicClient,http, anddefineChainfunctions fromviem - Define the chain details of your Tanssi EVM network, making sure to include all fields shown below. Both
publicanddefaultRPC URLs are required to be listed, even if they are the same - Create the
clientusing thecreatePublicClientfunction and pass in the network and the HTTP RPC endpoint
// 1. Import the necessary components from viem
import { createPublicClient, http, defineChain } from 'viem';

// 2. Specify the details of your EVM network
export const demoEVM = defineChain({
  id: 5678,
  name: 'demo',
  network: 'demo',
  nativeCurrency: {
    decimals: 18,
    name: 'TANGO',
    symbol: 'TANGO',
  },
  rpcUrls: {
    default: {
      http: ['https://services.tanssi-testnet.network/dancelight-2001'],
      webSocket: ['wss://services.tanssi-testnet.network/dancelight-2001'],
    },
    public: {
      http: ['https://services.tanssi-testnet.network/dancelight-2001'],
      webSocket: ['wss://services.tanssi-testnet.network/dancelight-2001'],
    },
  },
  blockExplorers: {
    default: {
      name: 'Explorer',
      url: 'https://dancelight-2001-blockscout.tanssi-chains.network/',
    },
  },
});

// 3. Create a public client for reading chain data
const rpcUrl = 'https://services.tanssi-testnet.network/dancelight-2001';
const publicClient = createPublicClient({
  chain: demoEVM,
  transport: http(rpcUrl),
});
For Writing Chain Data
To create a client for writing chain data, you can take the following steps:
- Import the
createWalletClient,http, anddefineChainfunctions fromviem, and theprivateKeyToAccountfunction fromviem/accounts - Define the chain details of your Tanssi EVM network, making sure to include all fields shown below. Both
publicanddefaultRPC URLs are required to be listed, even if they are the same - Create your account using the
privateKeyToAccountfunction - Create the
clientusing thecreateWalletClientfunction and pass in the account, network, and the HTTP RPC endpoint
Remember
This is for demo purposes only. Never store your private key in a TypeScript file.
// 1. Import the necessary components from viem and viem/accounts
import { createWalletClient, http, defineChain } from 'viem';
import { privateKeyToAccount } from 'viem/accounts';

// 2. Specify the details of your EVM network
export const demoEVM = defineChain({
  id: 5678,
  name: 'demo',
  network: 'demo',
  nativeCurrency: {
    decimals: 18,
    name: 'TANGO',
    symbol: 'TANGO',
  },
  rpcUrls: {
    default: {
      http: ['https://services.tanssi-testnet.network/dancelight-2001'],
      webSocket: ['wss://services.tanssi-testnet.network/dancelight-2001'],
    },
    public: {
      http: ['https://services.tanssi-testnet.network/dancelight-2001'],
      webSocket: ['wss://services.tanssi-testnet.network/dancelight-2001'],
    },
  },
  blockExplorers: {
    default: {
      name: 'Explorer',
      url: 'https://dancelight-2001-blockscout.tanssi-chains.network/',
    },
  },
});

// 3. Create your account using the privateKeyToAccount function
const account = privateKeyToAccount('INSERT_PRIVATE_KEY');
const rpcUrl = 'https://services.tanssi-testnet.network/dancelight-2001';

//4. Create a wallet client for writing chain data
const walletClient = createWalletClient({
  account,
  chain: demoEVM,
  transport: http(rpcUrl),
});
Note
To interact with browser-based wallets, you can use the following code to create an account. In this snippet, demo refers to the demo EVM network created with defineChain.
const [account] = await window.ethereum.request({
  method: 'eth_requestAccounts',
});
const walletClient = createWalletClient({
  account,
  chain: demo,
  transport: custom(window.ethereum),
});
Send a Transaction
During this section, you'll be creating a couple of scripts. The first one will check the balances of your accounts before trying to send a transaction. The second script will send the transaction. You can also use the balance script to check the account balances after the transaction has been sent.
Check Balances Script
You'll only need one file to check the balances of both addresses before and after the transaction is sent. To get started, you can create a balances.ts file by running:
touch balances.ts
Next, you will create the script for this file and complete the following steps:
- Update your imports to include the
createPublicClient,http,formatEther, anddefineChainfunctions fromviem - Define the chain details of your Tanssi EVM network, making sure to include all fields shown below. Both
publicanddefaultRPC URLs are required to be listed, even if they are the same - Set up a public viem client, which can be used for reading chain data, such as account balances
- Define the
addressFromandaddressTovariables - Create the asynchronous
balancesfunction that wraps thepublicClient.getBalancemethod - Use the
publicClient.getBalancefunction to fetch the balances for theaddressFromandaddressToaddresses. You can also leverage theformatEtherfunction to transform the balance into a more readable number (in TANGO for the demo EVM network) - Lastly, run the
balancesfunction
View balances.ts
// 1. Import the necessary components from viem
import { createPublicClient, http, formatEther, defineChain } from 'viem';

// 2. Specify the details of your EVM network
export const demoEVM = defineChain({
  id: 5678,
  name: 'demo',
  network: 'demo',
  nativeCurrency: {
    decimals: 18,
    name: 'UNIT',
    symbol: 'UNIT',
  },
  rpcUrls: {
    default: {
      http: ['https://services.tanssi-testnet.network/dancelight-2001'],
      webSocket: ['wss://services.tanssi-testnet.network/dancelight-2001'],
    },
    public: {
      http: ['https://services.tanssi-testnet.network/dancelight-2001'],
      webSocket: ['wss://services.tanssi-testnet.network/dancelight-2001'],
    },
  },
  blockExplorers: {
    default: {
      name: 'Explorer',
      url: 'https://dancelight-2001-blockscout.tanssi-chains.network/',
    },
  },
});

// 3. Create a public client for reading chain data
const rpcUrl = 'https://services.tanssi-testnet.network/dancelight-2001';
const publicClient = createPublicClient({
  chain: demoEVM,
  transport: http(rpcUrl),
});

// 4. Create address variables
const addressFrom = 'INSERT_ADDRESS_FROM';
const addressTo = 'INSERT_ADDRESS_TO';

// 5. Create balances function
const balances = async () => {
  // 6. Fetch balances
  const balanceFrom = formatEther(
    await publicClient.getBalance({ address: addressFrom })
  );
  const balanceTo = formatEther(
    await publicClient.getBalance({ address: addressTo })
  );

  console.log(`The balance of ${addressFrom} is: ${balanceFrom} TANGO`);
  console.log(`The balance of ${addressTo} is: ${balanceTo} TANGO`);
};

// 7. Call the balances function
balances();
To run the script and fetch the account balances, you can run the following command:
npx ts-node balances.ts
If successful, the balances for the origin and receiving address will be displayed in your terminal in TANGO.

Send Transaction Script
You'll only need one file to execute a transaction between accounts. For this example, you'll be transferring 1 TANGO token from an origin address on the demo EVM network (from which you hold the private key) to another address. To get started, you can create a transaction.ts file by running:
touch transaction.ts
Next, you will create the script for this file and complete the following steps:
- Update your imports to include
createPublicClient,createWalletClient,http,parseEther, anddefineChainfunctions fromviem, as well as theprivateKeyToAccountfunction fromviem/accounts - Define the chain details of your Tanssi EVM network, making sure to include all fields shown below. Both
publicanddefaultRPC URLs are required to be listed, even if they are the same - Set up a viem wallet client for writing chain data, which can be used along with your private key to send transactions. Note: This is for example purposes only. Never store your private keys in a TypeScript file
- Set up a public viem client for reading chain data, which will be used to wait for the transaction receipt
- Define the
addressTovariable - Create the asynchronous
sendfunction, which wraps the transaction object and thewalletClient.sendTransactionmethod - Use the
walletClient.sendTransactionfunction to sign and send the transaction. You'll need to pass in the transaction object, which only requires the recipient's address and the amount to send. Note thatparseEthercan be used, which handles the necessary unit conversions from Ether to Wei, similar to usingparseUnits(value, decimals). Useawaitto wait until the transaction is processed and the transaction hash is returned - Use the
publicClient.waitForTransactionReceiptfunction to wait for the transaction receipt, signaling that the transaction has been completed. This is particularly helpful if you need the transaction receipt or if you're running thebalances.tsscript directly after this one to check if the balances have been updated as expected - Lastly, run the
sendfunction
View transaction.ts
// 1. Import the necessary components from viem and viem/accounts
import {
  createPublicClient,
  createWalletClient,
  http,
  parseEther,
  defineChain,
} from 'viem';
import { privateKeyToAccount } from 'viem/accounts';

// 2. Specify the details of your EVM network
export const demoEVM = defineChain({
  id: 5678,
  name: 'demo',
  network: 'demo',
  nativeCurrency: {
    decimals: 18,
    name: 'TANGO',
    symbol: 'TANGO',
  },
  rpcUrls: {
    default: {
      http: ['https://services.tanssi-testnet.network/dancelight-2001'],
      webSocket: ['wss://services.tanssi-testnet.network/dancelight-2001'],
    },
    public: {
      http: ['https://services.tanssi-testnet.network/dancelight-2001'],
      webSocket: ['wss://services.tanssi-testnet.network/dancelight-2001'],
    },
  },
  blockExplorers: {
    default: {
      name: 'Explorer',
      url: 'https://dancelight-2001-blockscout.tanssi-chains.network/',
    },
  },
});

// 3. Create a wallet client for writing chain data
// The private key must be prepended with `0x` to avoid errors
const account = privateKeyToAccount('INSERT_PRIVATE_KEY');
const rpcUrl = 'https://services.tanssi-testnet.network/dancelight-2001';
const walletClient = createWalletClient({
  account,
  chain: demoEVM,
  transport: http(rpcUrl),
});

// 4. Create a public client for reading chain data
const publicClient = createPublicClient({
  chain: demoEVM,
  transport: http(rpcUrl),
});

// 5. Create to address variable
const addressTo = 'INSERT_ADDRESS_TO';

// 6. Create send function
const send = async () => {
  console.log(
    `Attempting to send transaction from ${account.address} to ${addressTo}`
  );

  // 7. Sign and send transaction
  const hash = await walletClient.sendTransaction({
    to: addressTo,
    value: parseEther('1'),
  });

  // 8. Wait for the transaction receipt
  await publicClient.waitForTransactionReceipt({
    hash,
  });

  console.log(`Transaction successful with hash: ${hash}`);
};

// 9. Call the send function
send();
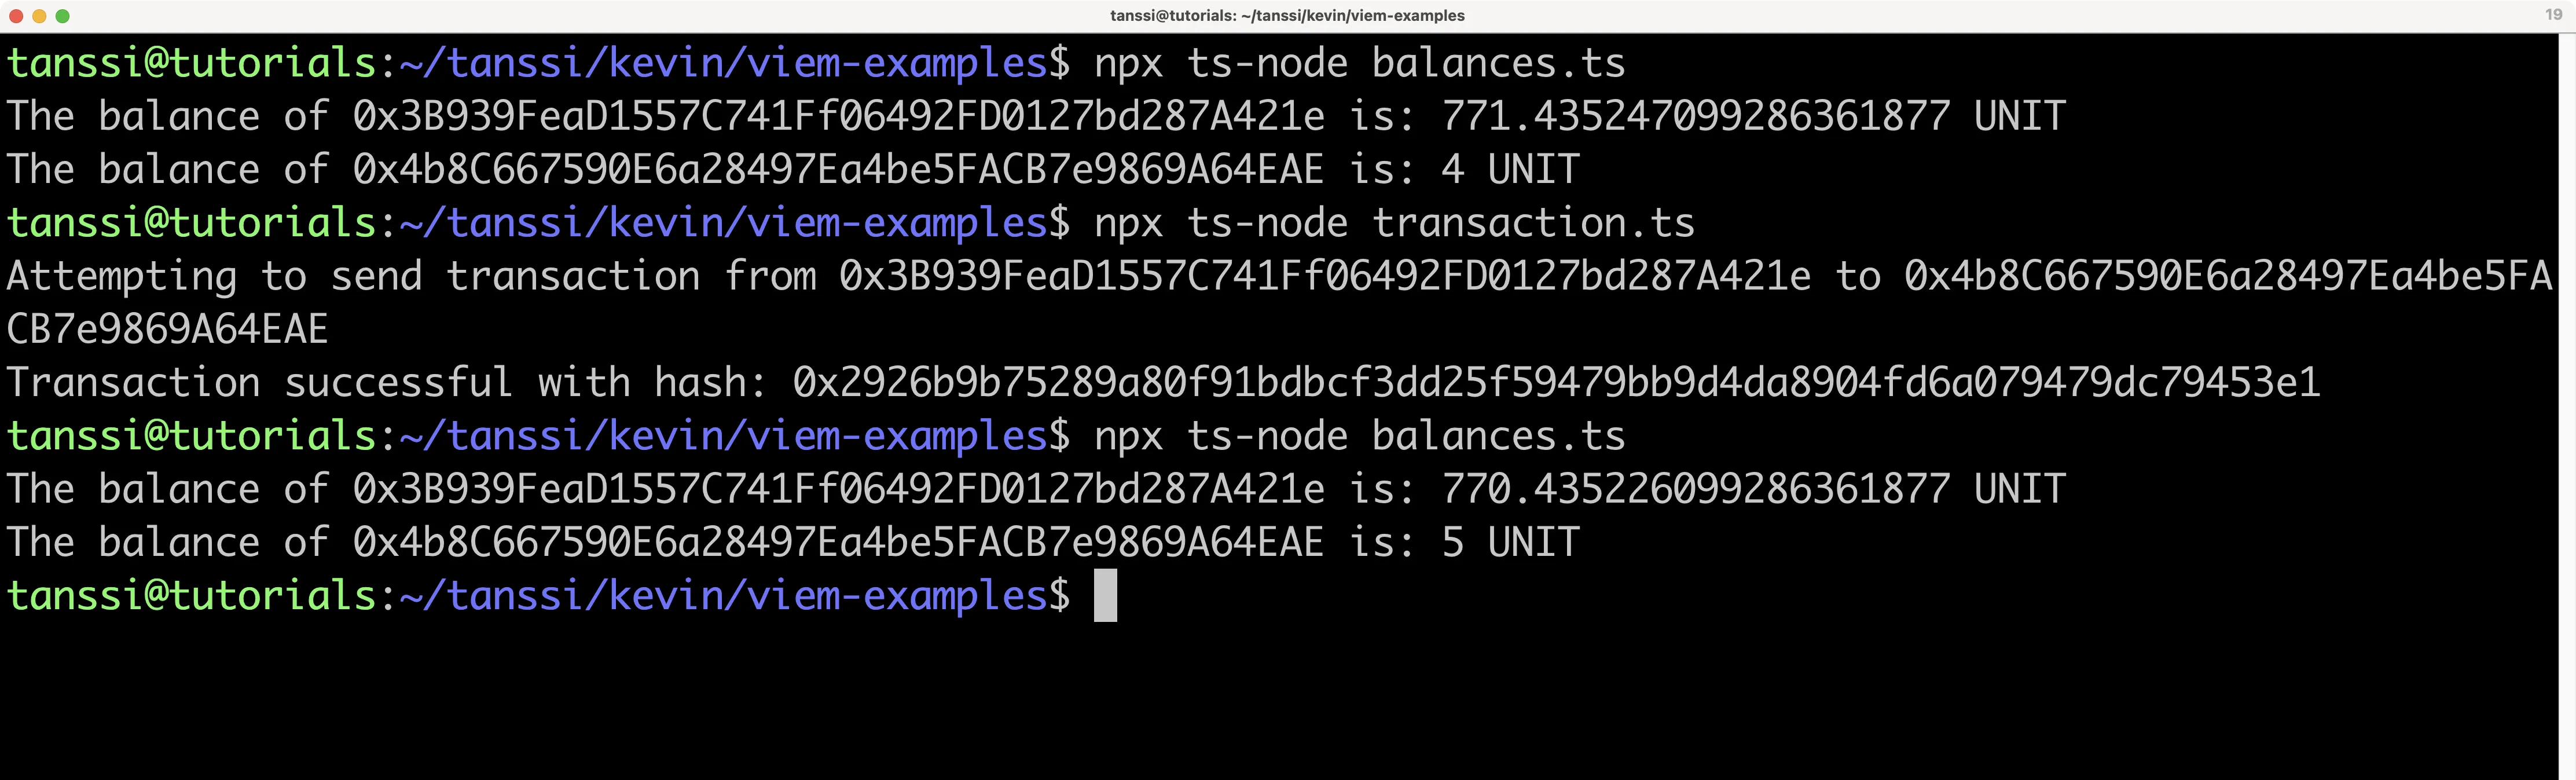
To run the script, you can run the following command in your terminal:
npx ts-node transaction.ts
If the transaction was successful, in your terminal, you'll see the transaction hash has been printed out. You can also use the balances.ts script to check that the balances for the origin and receiving accounts have changed. The entire workflow would look like this:
Deploy a Contract
The contract you'll be compiling and deploying in the next couple of sections is a simple incrementer contract, arbitrarily named Incrementer.sol. You can get started by creating a file for the contract:
touch Incrementer.sol
Next, you can add the Solidity code to the file:
// SPDX-License-Identifier: MIT

pragma solidity ^0.8.0;

contract Incrementer {
    uint256 public number;

    constructor(uint256 _initialNumber) {
        number = _initialNumber;
    }

    function increment(uint256 _value) public {
        number = number + _value;
    }

    function reset() public {
        number = 0;
    }
}
The constructor function, which runs when the contract is deployed, sets the initial value of the number variable stored on-chain (default is 0). The increment function adds the _value provided to the current number, but a transaction needs to be sent, which modifies the stored data. Lastly, the reset function resets the stored value to zero.
Note
This contract is a simple example for illustration purposes only.
Compile Contract Script
In this section, you'll create a script that uses the Solidity compiler to output the bytecode and interface (ABI) for the Incrementer.sol contract. To get started, you can create a compile.ts file by running:
touch compile.ts
Next, you will create the script for this file and complete the following steps:
- Import the
fsandsolcpackages - Using the
fs.readFileSyncfunction, you'll read and save the file contents ofIncrementer.soltosource - Build the
inputobject for the Solidity compiler by specifying thelanguage,sources, andsettingsto be used - Using the
inputobject, you can compile the contract usingsolc.compile - Extract the compiled contract file and export it to be used in the deployment script
// 1. Import packages
const fs = require('fs');
const solc = require('solc');

// 2. Get path and load contract
const source = fs.readFileSync('Incrementer.sol', 'utf8');

// 3. Create input object
const input = {
  language: 'Solidity',
  sources: {
    'Incrementer.sol': {
      content: source,
    },
  },
  settings: {
    outputSelection: {
      '*': {
        '*': ['*'],
      },
    },
  },
};
// 4. Compile the contract
const tempFile = JSON.parse(solc.compile(JSON.stringify(input)));
const contractFile = tempFile.contracts['Incrementer.sol']['Incrementer'];

// 5. Export contract data
export default contractFile;
Deploy Contract Script
With the script for compiling the Incrementer.sol contract in place, you can then use the results to send a signed transaction that deploys it. To do so, you can create a file for the deployment script called deploy.ts:
touch deploy.ts
Next, you will create the script for this file and complete the following steps:
- Update your imports to include the
createPublicClient,createWalletClient,http, anddefineChainfunctions fromviem, theprivateKeyToAccountfunction fromviem/accounts, and thecontractFilefrom thecompile.tsfile you created in the Compile Contract Script section - Define the chain details of your Tanssi EVM network, making sure to include all fields shown below. Both
publicanddefaultRPC URLs are required to be listed, even if they are the same - Set up a viem wallet client for writing chain data, which will be used along with your private key to deploy the
Incrementercontract. Note: This is for example purposes only. Never store your private keys in a TypeScript file - Set up a public viem client for reading chain data, which will be used to read the transaction receipt for the deployment
- Load the contract
bytecodeandabifor the compiled contract - Create the asynchronous
deployfunction that will be used to deploy the contract via thewalletClient.deployContractmethod - Use the
walletClient.deployContractfunction to sign and send the transaction. You'll need to pass in the contract's ABI and bytecode, the account to deploy the transaction from, and the initial value for the incrementer. Useawaitto wait until the transaction is processed and the transaction hash is returned - Use the
publicClient.readContractfunction to get the transaction receipt for the deployment. Useawaitto wait until the transaction is processed and the contract address is returned - Lastly, run the
deployfunction
View deploy.ts
// 1. Update import
import {
  createPublicClient,
  createWalletClient,
  http,
  defineChain,
} from 'viem';
import { privateKeyToAccount } from 'viem/accounts';
import contractFile from './compile';

// 2. Specify the details of your EVM network
export const demoEVM = defineChain({
  id: 5678,
  name: 'demo',
  network: 'demo',
  nativeCurrency: {
    decimals: 18,
    name: 'TANGO',
    symbol: 'TANGO',
  },
  rpcUrls: {
    default: {
      http: ['https://services.tanssi-testnet.network/dancelight-2001'],
      webSocket: ['wss://services.tanssi-testnet.network/dancelight-2001'],
    },
    public: {
      http: ['https://services.tanssi-testnet.network/dancelight-2001'],
      webSocket: ['wss://services.tanssi-testnet.network/dancelight-2001'],
    },
  },
  blockExplorers: {
    default: {
      name: 'Explorer',
      url: 'https://dancelight-2001-blockscout.tanssi-chains.network/',
    },
  },
});

// 3. Create a wallet client for writing chain data
// The private key must be prepended with `0x` to avoid errors
const account = privateKeyToAccount('INSERT_PRIVATE_KEY');
const rpcUrl = 'https://services.tanssi-testnet.network/dancelight-2001';
const walletClient = createWalletClient({
  account,
  chain: demoEVM,
  transport: http(rpcUrl),
});

// 4. Create a public client for reading chain data
const publicClient = createPublicClient({
  chain: demoEVM,
  transport: http(rpcUrl),
});

// 5. Load contract information
const bytecode = contractFile.evm.bytecode.object;
const abi = contractFile.abi;
const _initialNumber = 5;

// 6. Create deploy function
const deploy = async () => {
  console.log(`Attempting to deploy from account: ${account.address}`);

  // 7. Send transaction (initial value set to 5)
  const contract = await walletClient.deployContract({
    abi,
    account,
    bytecode,
    args: [_initialNumber],
  });

  // 8. Get the transaction receipt for the deployment
  const transaction = await publicClient.waitForTransactionReceipt({
    hash: contract,
  });

  console.log(`Contract deployed at address: ${transaction.contractAddress}`);
};

// 9. Call the deploy function
deploy();
To run the script, you can enter the following command into your terminal:
npx ts-node deploy.ts
If successful, the contract's address will be displayed in the terminal.

Read Contract Data (Call Methods)
Call methods are the type of interaction that doesn't modify the contract's storage (change variables), meaning no transaction needs to be sent. They simply read various storage variables of the deployed contract.
To get started, you can create a file and name it get.ts:
touch get.ts
Then you can take the following steps to create the script:
- Update your imports to include the
createPublicClient,http, anddefineChainfunctions fromviem, and thecontractFilefrom thecompile.tsfile you created in the Compile Contract Script section - Define the chain details of your Tanssi EVM network, making sure to include all fields shown below. Both
publicanddefaultRPC URLs are required to be listed, even if they are the same - Set up a public viem client for reading chain data, which will be used to read the current number of the
Incrementercontract - Create the
contractAddressvariable using the address of the deployed contract and theabivariable using thecontractFilefrom thecompile.tsfile - Create the asynchronous
getfunction - Call the contract using the
publicClient.readContractfunction, passing in theabi, the name of the function, thecontractAddress, and any arguments (if needed). You can useawait, which will return the value requested once the request promise resolves - Lastly, call the
getfunction
View get.ts
// 1. Update import
import { createPublicClient, http, defineChain } from 'viem';
import contractFile from './compile';

// 2. Specify the details of your EVM network
export const demoEVM = defineChain({
  id: 5678,
  name: 'demo',
  network: 'demo',
  nativeCurrency: {
    decimals: 18,
    name: 'TANGO',
    symbol: 'TANGO',
  },
  rpcUrls: {
    default: {
      http: ['https://services.tanssi-testnet.network/dancelight-2001'],
      webSocket: ['wss://services.tanssi-testnet.network/dancelight-2001'],
    },
    public: {
      http: ['https://services.tanssi-testnet.network/dancelight-2001'],
      webSocket: ['wss://services.tanssi-testnet.network/dancelight-2001'],
    },
  },
  blockExplorers: {
    default: {
      name: 'Explorer',
      url: 'https://dancelight-2001-blockscout.tanssi-chains.network/',
    },
  },
});

// 3. Create a public client for reading chain data
const rpcUrl = 'https://services.tanssi-testnet.network/dancelight-2001';
const publicClient = createPublicClient({
  chain: demoEVM,
  transport: http(rpcUrl),
});
// 4. Create contract variables
const contractAddress = 'INSERT_CONTRACT_ADDRESS';
const abi = contractFile.abi;

// 5. Create get function
const get = async () => {
  console.log(`Making a call to contract at address: ${contractAddress}`);

  // 6. Call contract
  const data = await publicClient.readContract({
    abi,
    functionName: 'number',
    address: contractAddress,
    args: [],
  });

  console.log(`The current number stored is: ${data}`);
};

// 7. Call get function
get();
To run the script, you can enter the following command in your terminal:
npx ts-node get.ts
If successful, the value will be displayed in the terminal.

Interact with Contract (Send Methods)
Send methods are the type of interactions that modify the contract's storage (change variables), meaning a transaction needs to be signed and sent. In this section, you'll create two scripts: one to increment and one to reset the incrementer. To get started, you can create a file for each script and name them increment.ts and reset.ts:
touch increment.ts reset.ts
Open the increment.ts file and take the following steps to create the script:
- Update your imports to include the
createPublicClient,createWalletClienthttp, anddefineChainfunctions fromviem, theprivateKeyToAccountfromviem/accounts'and thecontractFilefrom thecompile.tsfile you created in the Compile Contract Script section - Define the chain details of your Tanssi EVM network, making sure to include all fields shown below. Both
publicanddefaultRPC URLs are required to be listed, even if they are the same - Set up a viem wallet client for writing chain data, which will be used along with your private key to send a transaction. Note: This is for example purposes only. Never store your private keys in a TypeScript file
- Set up a public viem client for reading chain data, which will be used to wait for the transaction receipt
- Create the
contractAddressvariable using the address of the deployed contract, theabivariable using thecontractFilefrom thecompile.tsfile, and the_valueto increment the contract by - Create the asynchronous
incrementfunction - Call the contract using the
walletClient.writeContractfunction, passing in theabi, the name of the function, thecontractAddress, and the_value. You can useawait, which will return the transaction hash once the request promise resolves - Use the
publicClient.waitForTransactionReceiptfunction to wait for the transaction receipt, signaling that the transaction has been completed. This is particularly helpful if you need the transaction receipt or if you're running theget.tsscript directly after this one to check that the current number has been updated as expected - Lastly, call the
incrementfunction
View increment.ts
// 1. Update import
import {
  createPublicClient,
  createWalletClient,
  http,
  defineChain,
} from 'viem';
import { privateKeyToAccount } from 'viem/accounts';
import contractFile from './compile';

// 2. Specify the details of your EVM network
export const demoEVM = defineChain({
  id: 5678,
  name: 'demo',
  network: 'demo',
  nativeCurrency: {
    decimals: 18,
    name: 'TANGO',
    symbol: 'TANGO',
  },
  rpcUrls: {
    default: {
      http: ['https://services.tanssi-testnet.network/dancelight-2001'],
      webSocket: ['wss://services.tanssi-testnet.network/dancelight-2001'],
    },
    public: {
      http: ['https://services.tanssi-testnet.network/dancelight-2001'],
      webSocket: ['wss://services.tanssi-testnet.network/dancelight-2001'],
    },
  },
  blockExplorers: {
    default: {
      name: 'Explorer',
      url: 'https://dancelight-2001-blockscout.tanssi-chains.network/',
    },
  },
});

// 3. Create a wallet client for writing chain data
// The private key must be prepended with `0x` to avoid errors
const account = privateKeyToAccount('INSERT_PRIVATE_KEY');
const rpcUrl = 'https://services.tanssi-testnet.network/dancelight-2001';
const walletClient = createWalletClient({
  account,
  chain: demoEVM,
  transport: http(rpcUrl),
});

// 4. Create a public client for reading chain data
const publicClient = createPublicClient({
  chain: demoEVM,
  transport: http(rpcUrl),
});

// 5. Create contract variables
const contractAddress = 'INSERT_CONTRACT_ADDRESS';
const abi = contractFile.abi;
const _value = 3;

// 6. Create increment function
const increment = async () => {
  console.log(
    `Calling the increment by ${_value} function in contract at address: ${contractAddress}`
  );
  // 7. Call contract
  const hash = await walletClient.writeContract({
    abi,
    functionName: 'increment',
    address: contractAddress,
    args: [_value],
  });

  // 8. Wait for the transaction receipt
  await publicClient.waitForTransactionReceipt({
    hash,
  });

  console.log(`Transaction successful with hash: ${hash}`);
};

// 9. Call increment function
increment();
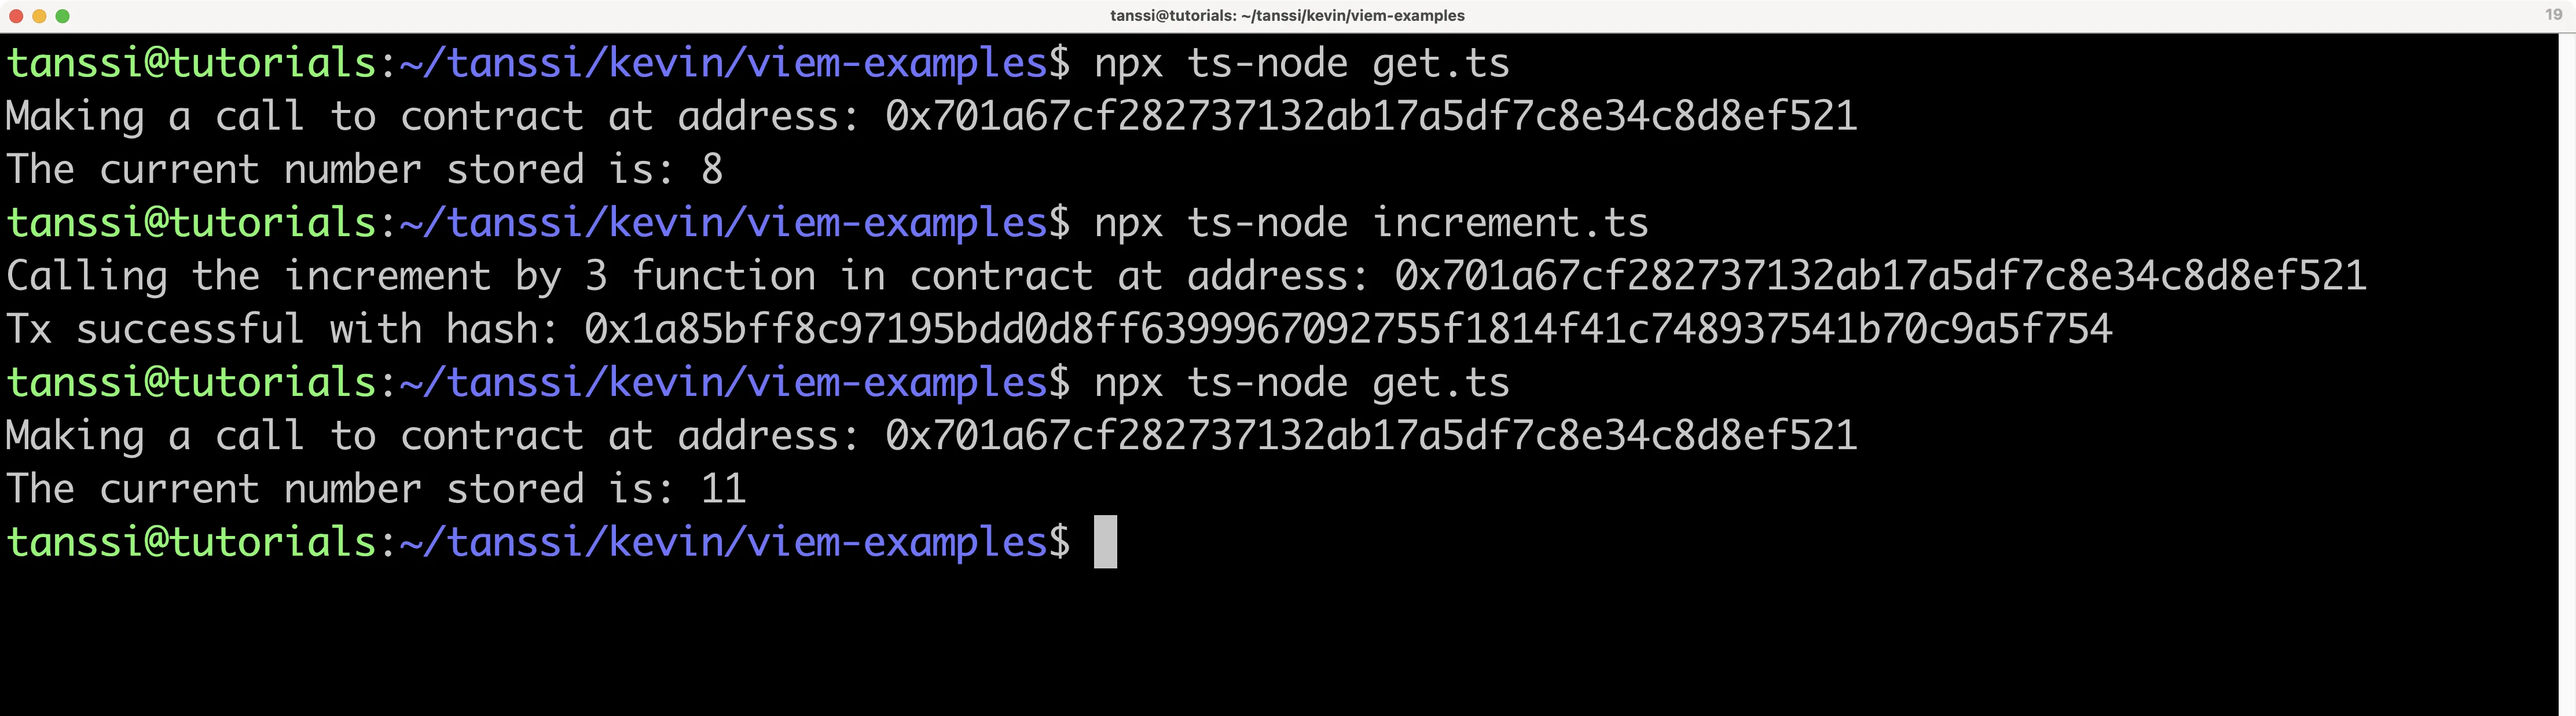
To run the script, you can enter the following command in your terminal:
npx ts-node increment.ts
If successful, the transaction hash will be displayed in the terminal. You can use the get.ts script alongside the increment.ts script to make sure that value is changing as expected.
Next, you can open the reset.ts file and take the following steps to create the script:
- Update your imports to include the
createPublicClient,createWalletClienthttp, anddefineChainfunctions fromviem, theprivateKeyToAccountfromviem/accounts'and thecontractFilefrom thecompile.tsfile you created in the Compile Contract Script section - Define the chain details of your Tanssi EVM network, making sure to include all fields shown below. Both
publicanddefaultRPC URLs are required to be listed, even if they are the same - Set up a viem wallet client for writing chain data, which will be used along with your private key to send a transaction. Note: This is for example purposes only. Never store your private keys in a TypeScript file
- Set up a public viem client for reading chain data, which will be used to wait for the transaction receipt
- Create the
contractAddressvariable using the address of the deployed contract and theabivariable using thecontractFilefrom thecompile.tsfile to increment the contract by - Create the asynchronous
resetfunction - Call the contract using the
walletClient.writeContractfunction, passing in theabi, the name of the function, thecontractAddress, and an empty array for the arguments. You can useawait, which will return the transaction hash once the request promise resolves - Use the
publicClient.waitForTransactionReceiptfunction to wait for the transaction receipt, signaling that the transaction has been completed. This is particularly helpful if you need the transaction receipt or if you're running theget.tsscript directly after this one to check that the current number has been reset to0 - Lastly, call the
resetfunction
View reset.ts
// 1. Update import
import {
  createPublicClient,
  createWalletClient,
  http,
  defineChain,
} from 'viem';
import { privateKeyToAccount } from 'viem/accounts';
import contractFile from './compile';

// 2. Specify the details of your EVM network
export const demoEVM = defineChain({
  id: 5678,
  name: 'demo',
  network: 'demo',
  nativeCurrency: {
    decimals: 18,
    name: 'TANGO',
    symbol: 'TANGO',
  },
  rpcUrls: {
    default: {
      http: ['https://services.tanssi-testnet.network/dancelight-2001'],
      webSocket: ['wss://services.tanssi-testnet.network/dancelight-2001'],
    },
    public: {
      http: ['https://services.tanssi-testnet.network/dancelight-2001'],
      webSocket: ['wss://services.tanssi-testnet.network/dancelight-2001'],
    },
  },
  blockExplorers: {
    default: {
      name: 'Explorer',
      url: 'https://dancelight-2001-blockscout.tanssi-chains.network/',
    },
  },
});

// 3. Create a wallet client for writing chain data
// The private key must be prepended with `0x` to avoid errors
const account = privateKeyToAccount('INSERT_PRIVATE_KEY');
const rpcUrl = 'https://services.tanssi-testnet.network/dancelight-2001';
const walletClient = createWalletClient({
  account,
  chain: demoEVM,
  transport: http(rpcUrl),
});

// 4. Create a public client for reading chain data
const publicClient = createPublicClient({
  chain: demoEVM,
  transport: http(rpcUrl),
});

// 5. Create contract variables
const contractAddress = 'INSERT_CONTRACT_ADDRESS';
const abi = contractFile.abi;

// 6. Create reset function
const reset = async () => {
  console.log(
    `Calling the reset function in contract at address: ${contractAddress}`
  );

  // 7. Call contract
  const hash = await walletClient.writeContract({
    abi,
    functionName: 'reset',
    address: contractAddress,
    args: [],
  });

  // 8. Wait for the transaction receipt
  await publicClient.waitForTransactionReceipt({
    hash,
  });

  console.log(`Transaction successful with hash: ${hash}`);
};

// 9. Call reset function
reset();
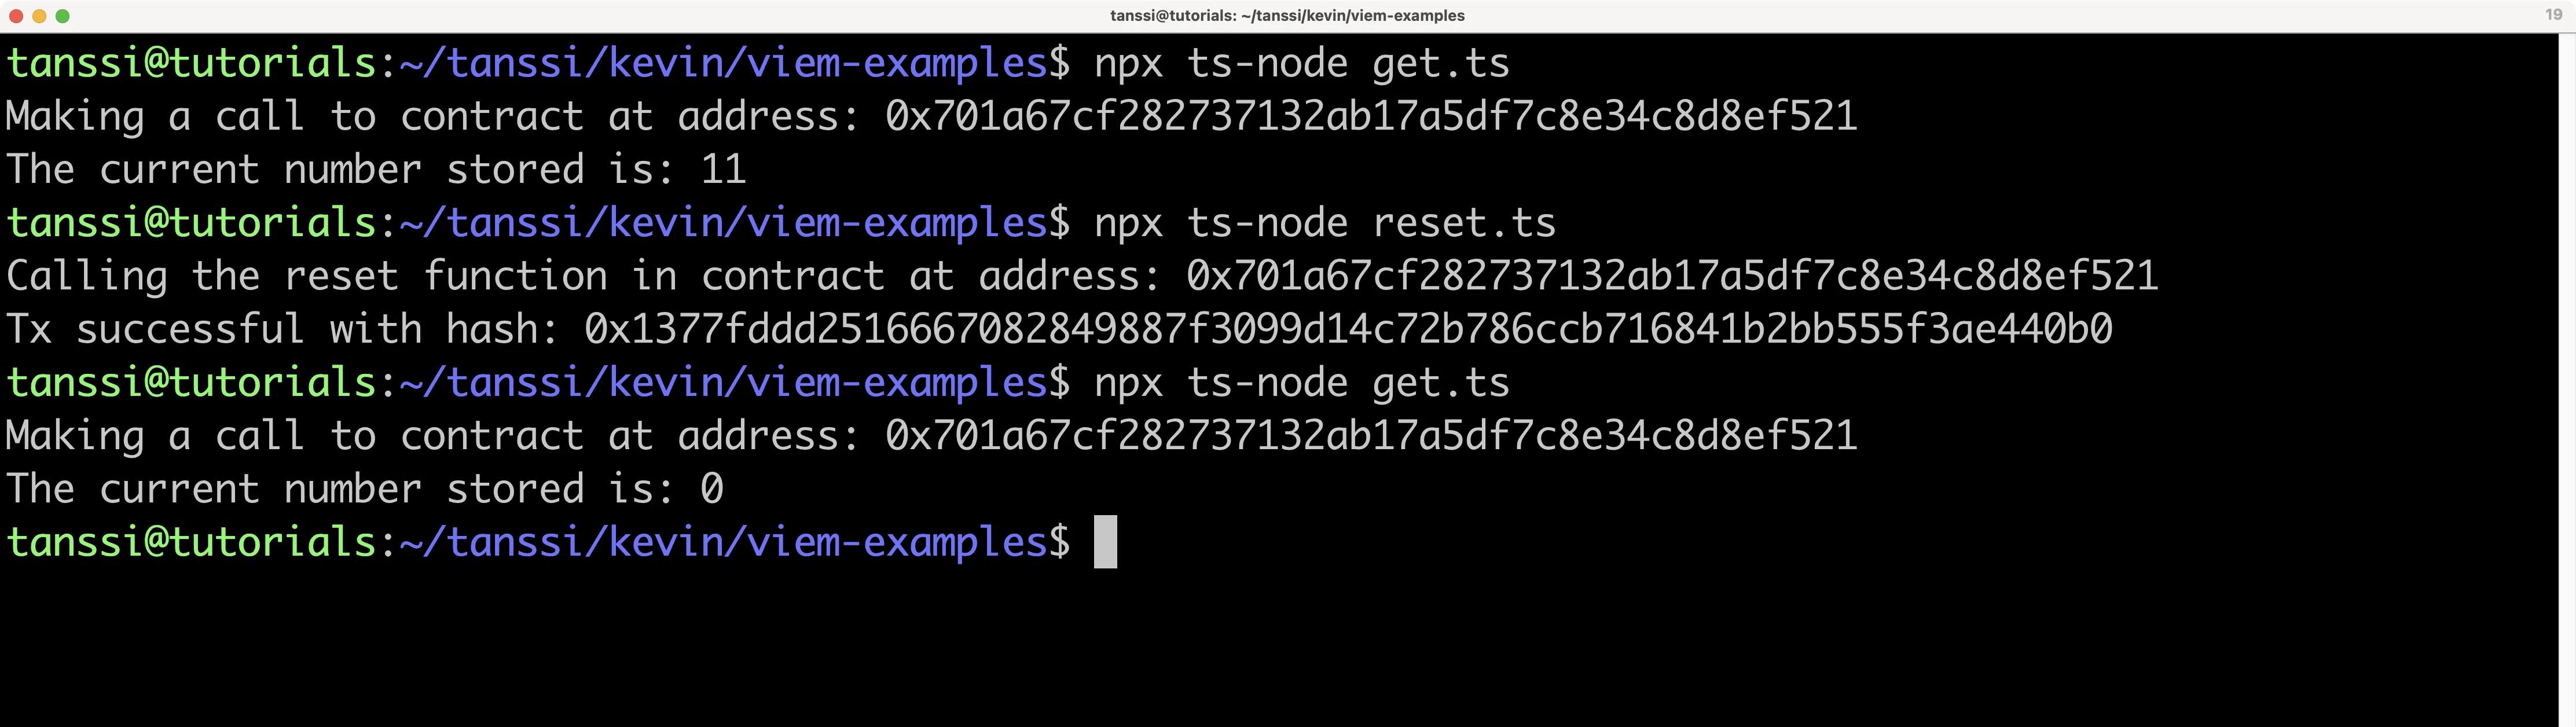
To run the script, you can enter the following command in your terminal:
npx ts-node reset.ts
If successful, the transaction hash will be displayed in the terminal. You can use the get.ts script alongside the reset.ts script to make sure that value is changing as expected.
| Created: January 30, 2026