Deploy on Paseo TestNet
AdvancedIntroduction
Previously, you learned how to build and run a blockchain locally. Now, you'll take the next step towards a production-like environment by deploying your parachain to a public test network.
This tutorial guides you through deploying a parachain on the Paseo network, a public TestNet that provides a more realistic blockchain ecosystem. While public testnets have a higher barrier to entry compared to private networks, they are crucial for validating your parachain's functionality and preparing it for eventual mainnet deployment.
Get Started with an Account and Tokens
To perform any action on Paseo, you need PAS tokens, which can be requested from the Polkadot Faucet. To store the tokens, you must have access to a Substrate-compatible wallet. Go to the Polkadot Wallets page on the Polkadot Wiki to view different options for a wallet, or use the Polkadot.js browser extension, which is suitable for development purposes.
Warning
Development keys and accounts should never hold assets of actual value and should not be used for production.
The Polkadot.js Apps interface can be used to get you started for testing purposes.
To prepare an account, follow these steps:
-
Open the Polkadot.js Apps interface and connect to the Paseo network. Alternatively use this link to connect directly to Paseo: Polkadot.js Apps: Paseo

-
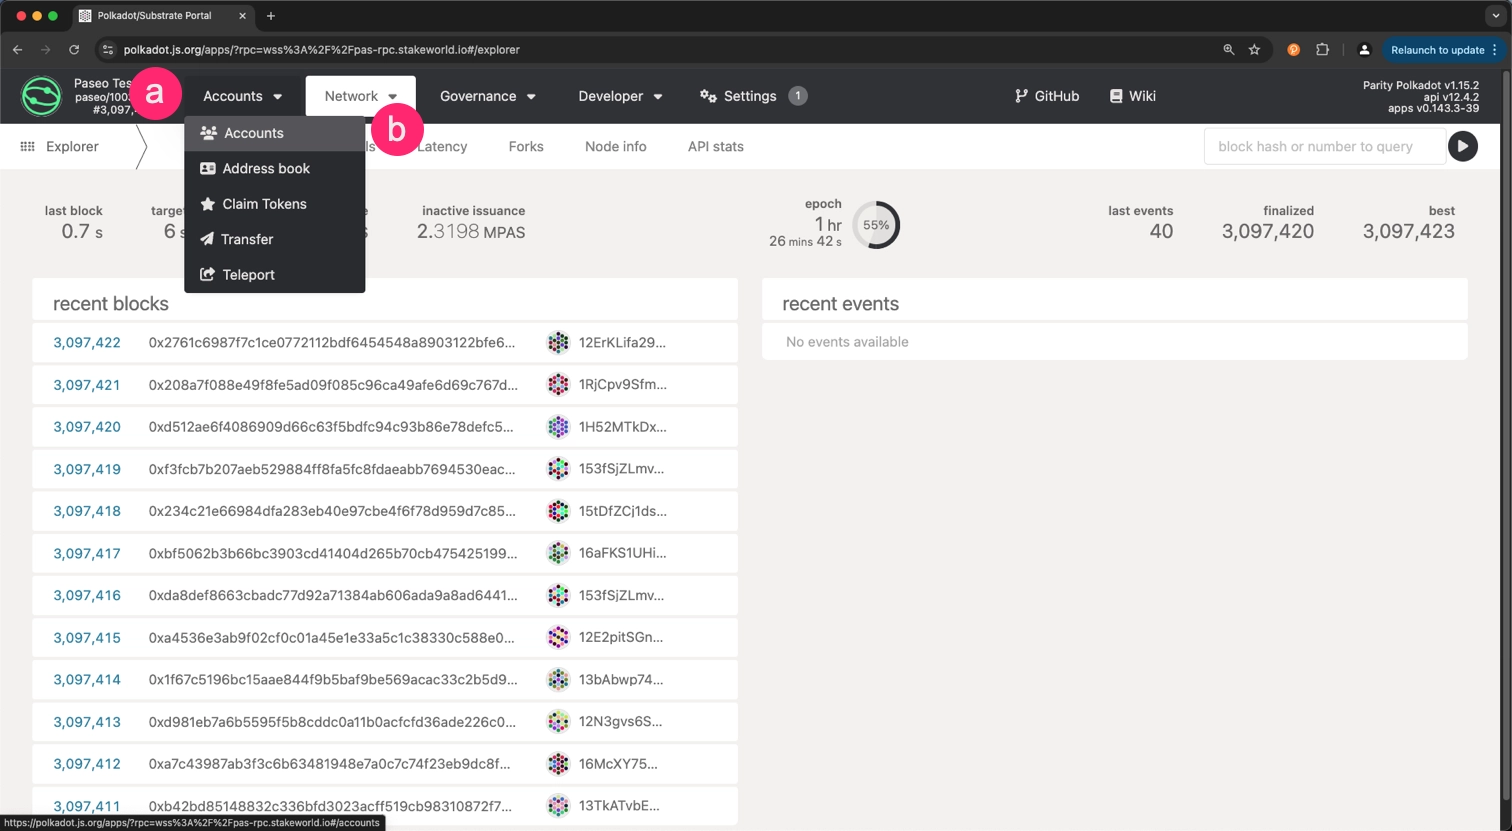
Navigate to the Accounts section
- Click on the Accounts tab in the top menu
- Select the Accounts option from the dropdown menu
-
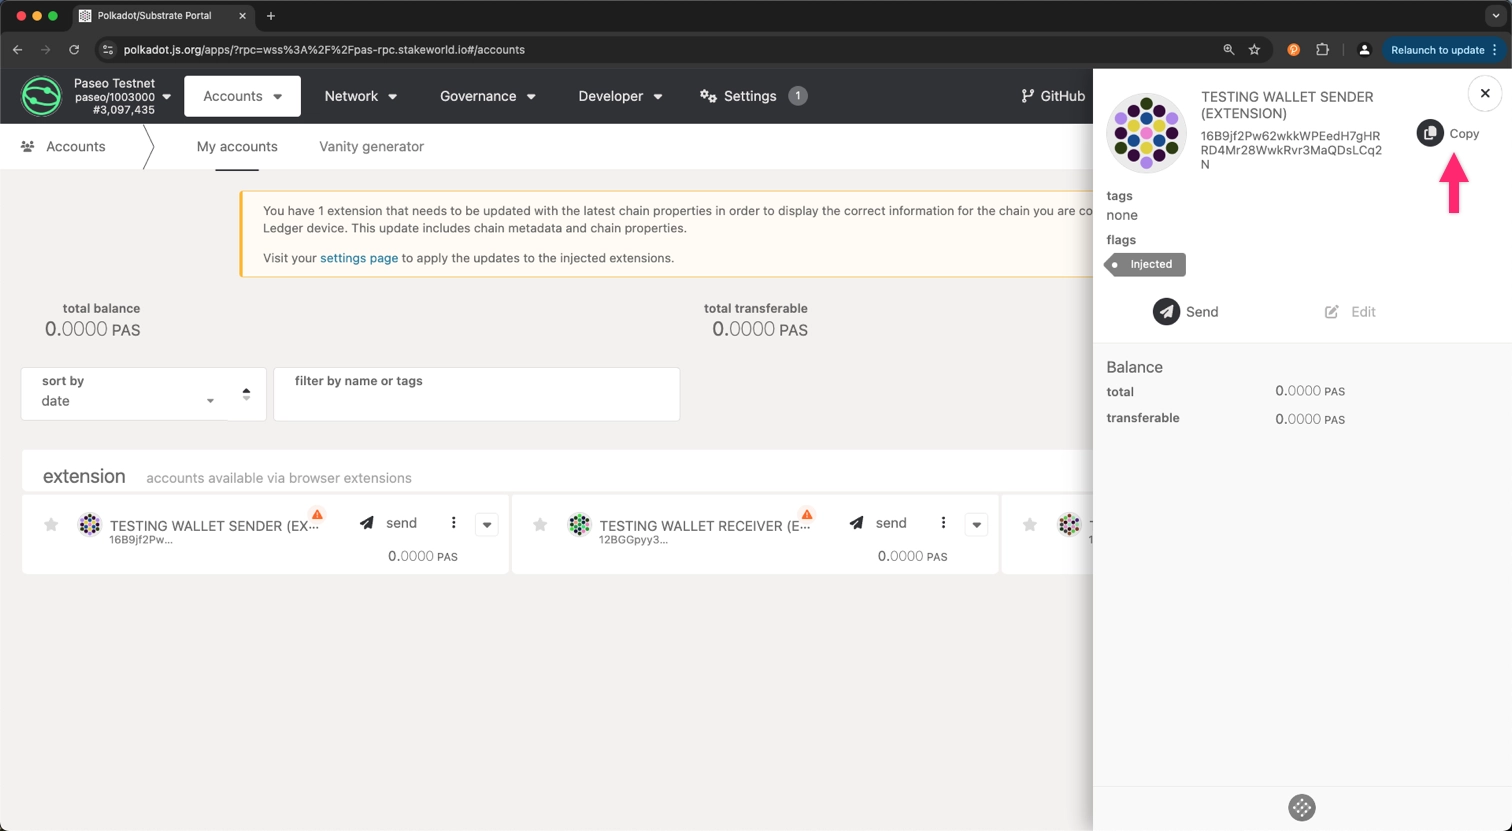
Copy the address of the account you want to use for the parachain deployment
-
Visit the Polkadot Faucet and paste the copied address in the input field. Ensure that the network is set to Paseo and click on the Get some PASs button
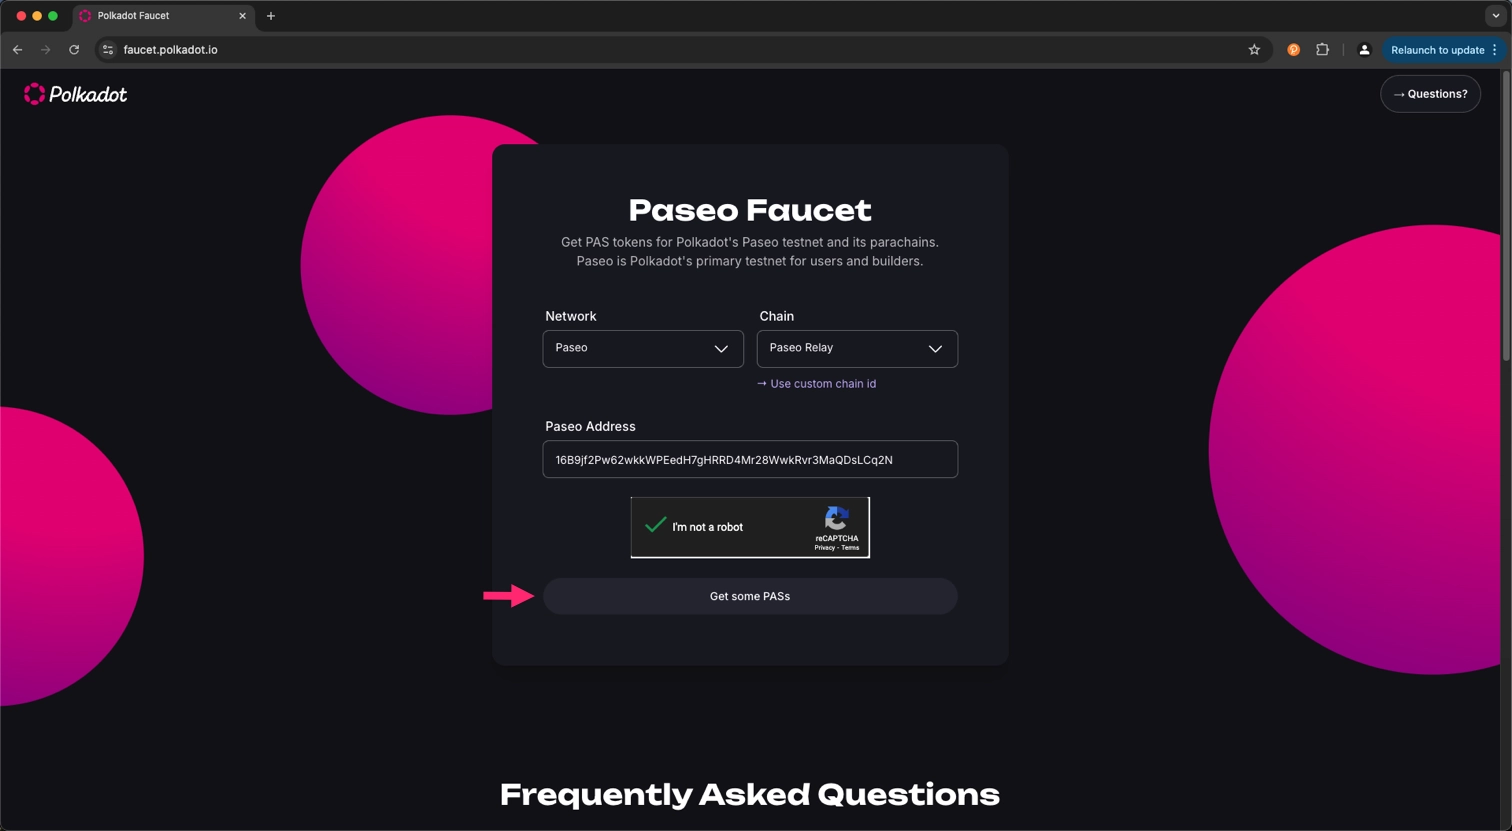
After a few seconds, you will receive 5000 PAS tokens in your account.
Reserve a Parachain Identifier
You must reserve a parachain identifier (ID) before registering your parachain on Paseo. You'll be assigned the next available identifier.
To reserve a parachain identifier, follow these steps:
-
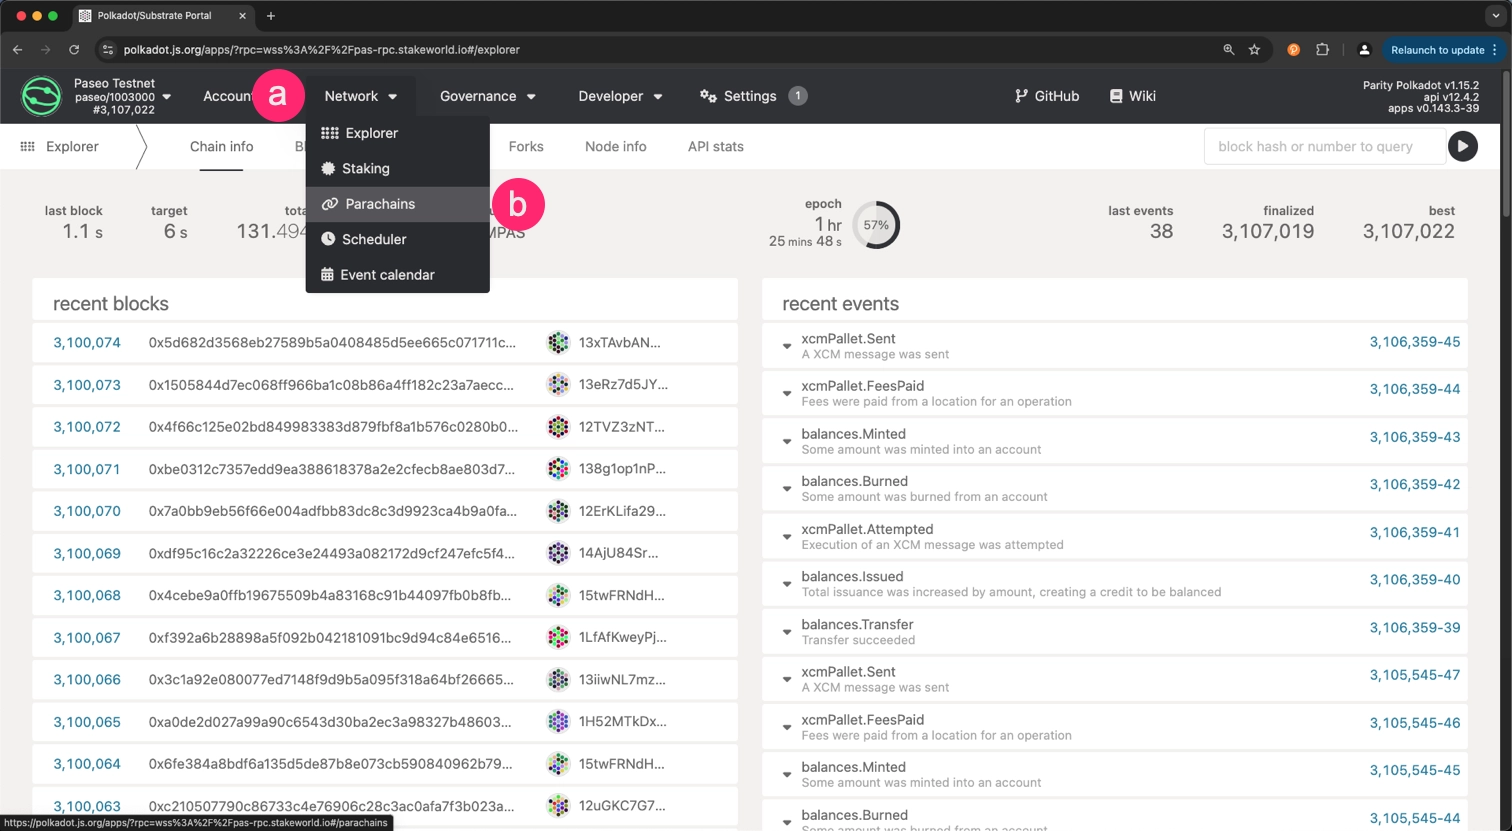
Navigate to the Parachains section
- Click on the Network tab in the top menu
- Select the Parachains option from the dropdown menu
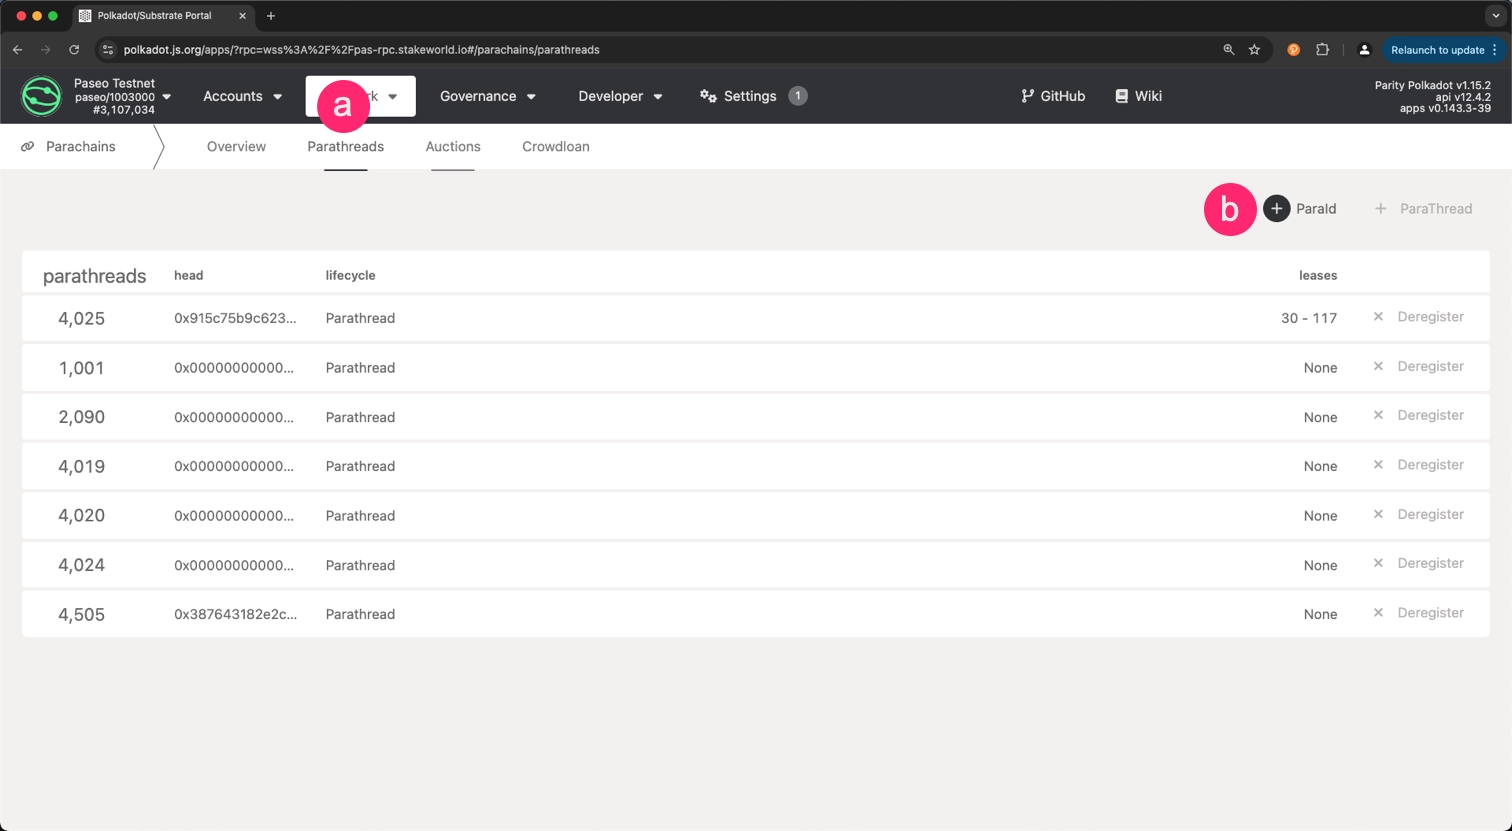
-
Register a ParaId
- Select the Parathreads tab
- Click on the + ParaId button
-
Review the transaction and click on the + Submit button
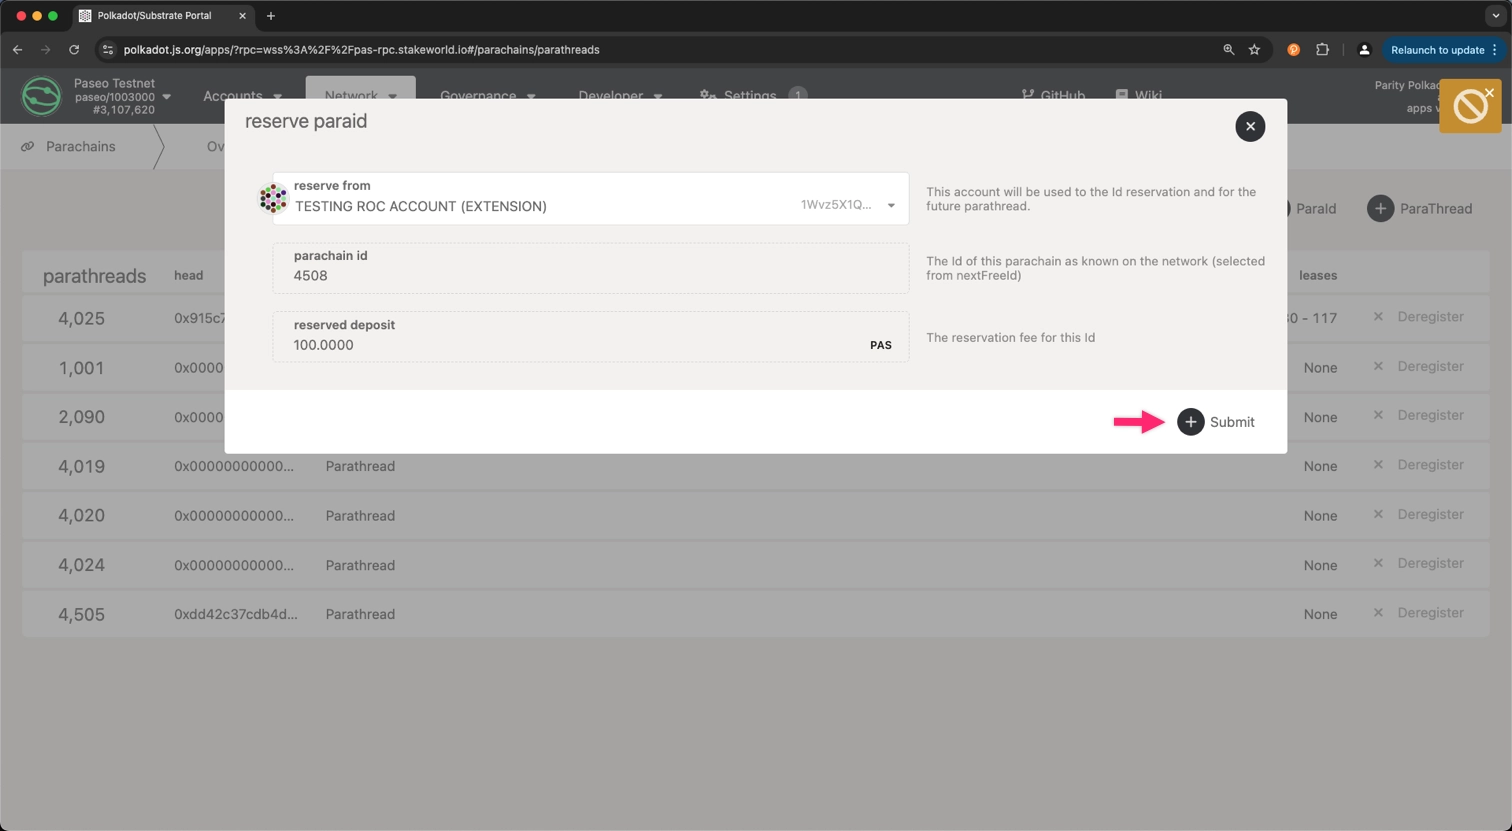
For this case, the next available parachain identifier is
4508. -
After submitting the transaction, you can navigate to the Explorer tab and check the list of recent events for successful
registrar.Reserved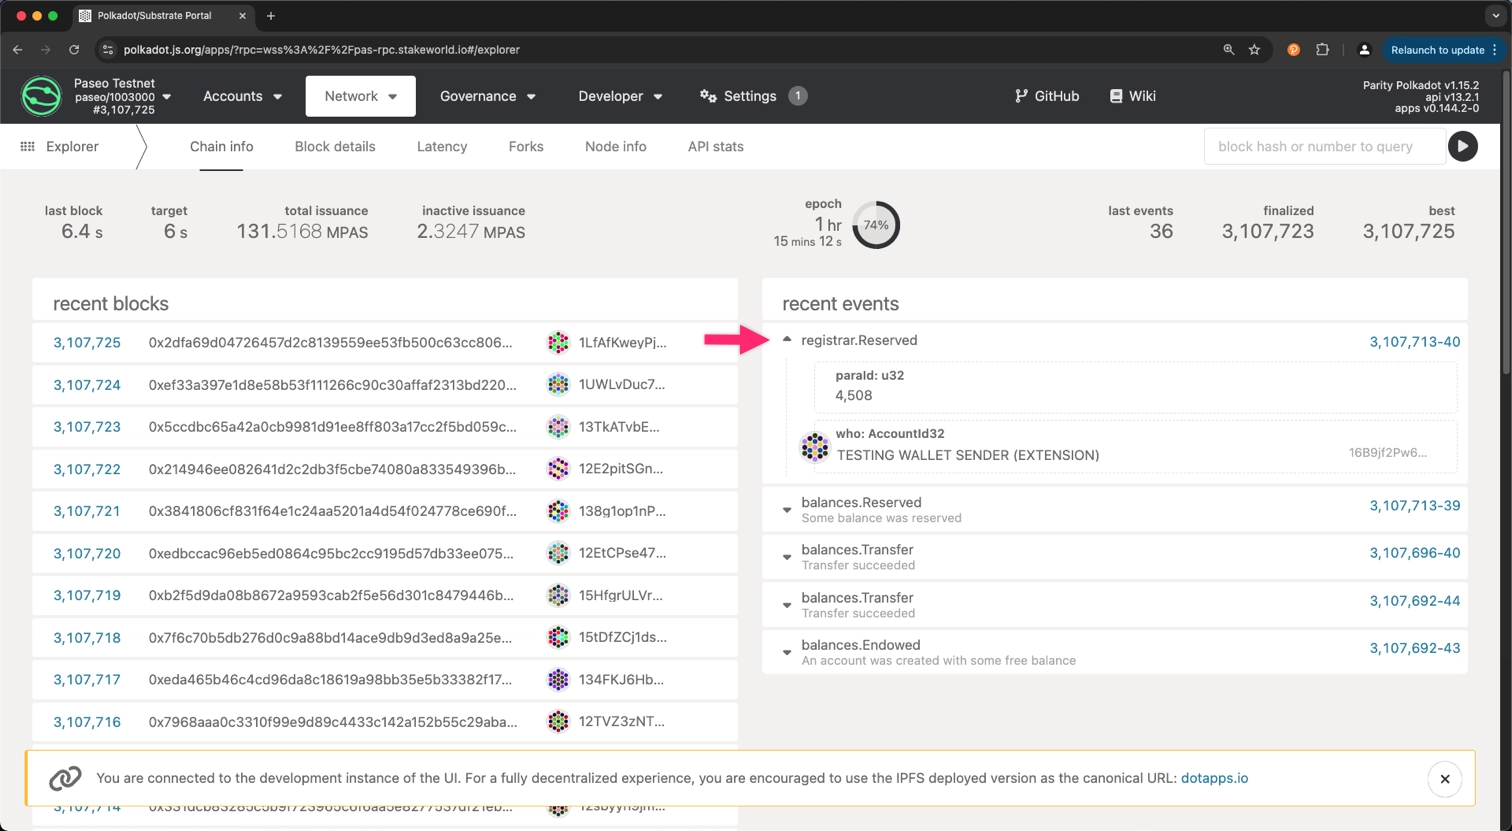
Generate Customs Keys for Your Collator
To securely deploy your parachain, it is essential to generate custom keys specifically for your collators (block producers). You should generate two sets of keys for each collator:
-
Account keys - used to interact with the network and manage funds. These should be protected carefully and should never exist on the filesystem of the collator node
-
Session keys - used in block production to identify your node and its blocks on the network. These keys are stored in the parachain keystore and function as disposable "hot wallet" keys. If these keys are leaked, someone could impersonate your node, which could result in the slashing of your funds. To minimize these risks, rotating your session keys frequently is essential. Treat them with the same level of caution as you would a hot wallet to ensure the security of your node
To perform this step, you can use subkey, a command-line tool for generating and managing keys:
The output should look similar to the following:
Secret phrase: lemon play remain picture leopard frog mad bridge hire hazard best buddy
Network ID: substrate
Secret seed: 0xb748b501de061bae1fcab1c0b814255979d74d9637b84e06414a57a1a149c004
Public key (hex): 0xf4ec62ec6e70a3c0f8dcbe0531e2b1b8916cf16d30635bbe9232f6ed3f0bf422
Account ID: 0xf4ec62ec6e70a3c0f8dcbe0531e2b1b8916cf16d30635bbe9232f6ed3f0bf422
Public key (SS58): 5HbqmBBJ5ALUzho7tw1k1jEgKBJM7dNsQwrtfSfUskT1a3oe
SS58 Address: 5HbqmBBJ5ALUzho7tw1k1jEgKBJM7dNsQwrtfSfUskT1a3oe
Ensure that this command is executed twice to generate the keys for both the account and session keys. Save them for future reference.
Generate the Chain Specification
Polkadot SDK-based blockchains are defined by a file called the chain specification, or chain spec for short. There are two types of chain spec files:
- Plain chain spec - a human-readable JSON file that can be modified to suit your parachain's requirements. It serves as a template for initial configuration and includes human-readable keys and structures
- Raw chain spec - a binary-encoded file used to start your parachain node. This file is generated from the plain chain spec and contains the encoded information necessary for the parachain node to synchronize with the blockchain network. It ensures compatibility across different runtime versions by providing data in a format directly interpretable by the node's runtime, regardless of upgrades since the chain's genesis
The chain spec file is only required during the initial blockchain creation (genesis). You do not need to generate a new chain spec when performing runtime upgrades after your chain is already running.
The files required to register a parachain must specify the correct relay chain to connect to and the parachain identifier you have been assigned. To make these changes, you must build and modify the chain specification file for your parachain. In this tutorial, the relay chain is paseo, and the parachain identifier is 4508.
To define your chain specification:
-
Generate the plain chain specification for the parachain template node by running the following command. Make sure to use the
*.compact.compressed.wasmversion of your compiled runtime when generating your chain specification, and replaceINSERT_PARA_IDwith the ID you obtained in the Reserve a Parachain Identifier section: -
Edit the
plain_chain_spec.jsonfile:- Update the
name,id, andprotocolIdfields to unique values for your parachain - Change
para_idandparachainInfo.parachainIdfields to the parachain ID you obtained previously. Make sure to use a number without quotes - Modify the
balancesfield to specify the initial balances for your accounts in SS58 format - Insert the account IDs and session keys in SS58 format generated for your collators in the
collatorSelection.invulnerablesandsession.keysfields - Modify the
sudovalue to specify the account that will have sudo access to the parachain
{
    "bootNodes": [],
    "chainType": "Live",
    "codeSubstitutes": {},
    "genesis": {
        "runtimeGenesis": {
            "code": "0x...",
            "patch": {
                "aura": {
                    "authorities": []
                },
                "auraExt": {},
                "balances": {
                    "balances": [["INSERT_SUDO_ACCOUNT", 1152921504606846976]]
                },
                "collatorSelection": {
                    "candidacyBond": 16000000000,
                    "desiredCandidates": 0,
                    "invulnerables": ["INSERT_ACCOUNT_ID_COLLATOR_1"]
                },
                "parachainInfo": {
                    "parachainId": "INSERT_PARA_ID"
                },
                "parachainSystem": {},
                "polkadotXcm": {
                    "safeXcmVersion": 4
                },
                "session": {
                    "keys": [
                        [
                            "INSERT_ACCOUNT_ID_COLLATOR_1",
                            "INSERT_ACCOUNT_ID_COLLATOR_1",
                            {
                                "aura": "INSERT_SESSION_KEY_COLLATOR_1"
                            }
                        ]
                    ],
                    "nonAuthorityKeys": []
                },
                "sudo": {
                    "key": "INSERT_SUDO_ACCOUNT"
                },
                "system": {},
                "transactionPayment": {
                    "multiplier": "1000000000000000000"
                }
            }
        }
    },
    "id": "INSERT_ID",
    "name": "INSERT_NAME",
    "para_id": "INSERT_PARA_ID",
    "properties": {
        "tokenDecimals": 12,
        "tokenSymbol": "UNIT"
    },
    "protocolId": "INSERT_PROTOCOL_ID",
    "relay_chain": "paseo",
    "telemetryEndpoints": null
}
For this tutorial, the
plain_chain_spec.jsonfile should look similar to the following. Take into account that the same account is being used for the collator and sudo, which must not be the case in a production environment:View complete script
plain_chain_spec.json{ "bootNodes": [], "chainType": "Live", "codeSubstitutes": {}, "genesis": { "runtimeGenesis": { "code": "0x...", "patch": { "aura": { "authorities": [] }, "auraExt": {}, "balances": { "balances": [ [ "5F9Zteceg3Q4ywi63AxQNVb2b2r5caFSqjQxBkCrux6j8ZpS", 1152921504606846976 ] ] }, "collatorSelection": { "candidacyBond": 16000000000, "desiredCandidates": 0, "invulnerables": [ "5F9Zteceg3Q4ywi63AxQNVb2b2r5caFSqjQxBkCrux6j8ZpS" ] }, "parachainInfo": { "parachainId": 4508 }, "parachainSystem": {}, "polkadotXcm": { "safeXcmVersion": 4 }, "session": { "keys": [ [ "5F9Zteceg3Q4ywi63AxQNVb2b2r5caFSqjQxBkCrux6j8ZpS", "5F9Zteceg3Q4ywi63AxQNVb2b2r5caFSqjQxBkCrux6j8ZpS", { "aura": "5GcAKNdYcw5ybb2kAnta8WVFyiQbGJ5od3aH9MsgYDmVcrhJ" } ] ], "nonAuthorityKeys": [] }, "sudo": { "key": "5F9Zteceg3Q4ywi63AxQNVb2b2r5caFSqjQxBkCrux6j8ZpS" }, "system": {}, "transactionPayment": { "multiplier": "1000000000000000000" } } } }, "id": "custom", "name": "Custom", "para_id": 4508, "properties": { "tokenDecimals": 12, "tokenSymbol": "UNIT" }, "protocolId": null, "relay_chain": "paseo", "telemetryEndpoints": null } - Update the
-
Save your changes and close the plain text chain specification file
-
Convert the modified plain chain specification file to a raw chain specification file:
You should now see your chain specification containing SCALE-encoded hex values versus plain text.
Deprecation of para_id in Chain Specs
The para_id field in JSON chain specifications, added through the chain-spec-builder command, is currently used by nodes for configuration purposes. However, beginning with Polkadot SDK release stable2509, the para_id field will no longer be required in chain specifications. Instead, runtimes need to be updated to implement the cumulus_primitives_core::GetParachainInfo trait to successfully operate with nodes using chain specs that omit the para_id field.
With the upcoming stable2512 release, the para_id field will be completely removed from chain specifications in favor of the new runtime API. New nodes will be unable to start with chain specs containing the para_id field unless the runtime implements the GetParachainInfo trait. Ensure your runtime is updated to maintain compatibility with future node versions.
For guidance on performing runtime upgrades to implement this new trait, refer to the runtime upgrade tutorial.
Export Required Files
To prepare the parachain collator to be registered on Paseo, follow these steps:
-
Export the Wasm runtime for the parachain by running the following command:
-
Export the genesis state for the parachain by running the following command:
Register a Parathread
Once you have the genesis state and runtime, you can now register these with your parachain ID.
-
Go to the Parachains > Parathreads tab, and select + Parathread
-
You should see fields to place your runtime Wasm and genesis state respectively, along with the parachain ID. Select your parachain ID, and upload
para-wasmin the code field andpara-statein the initial state field: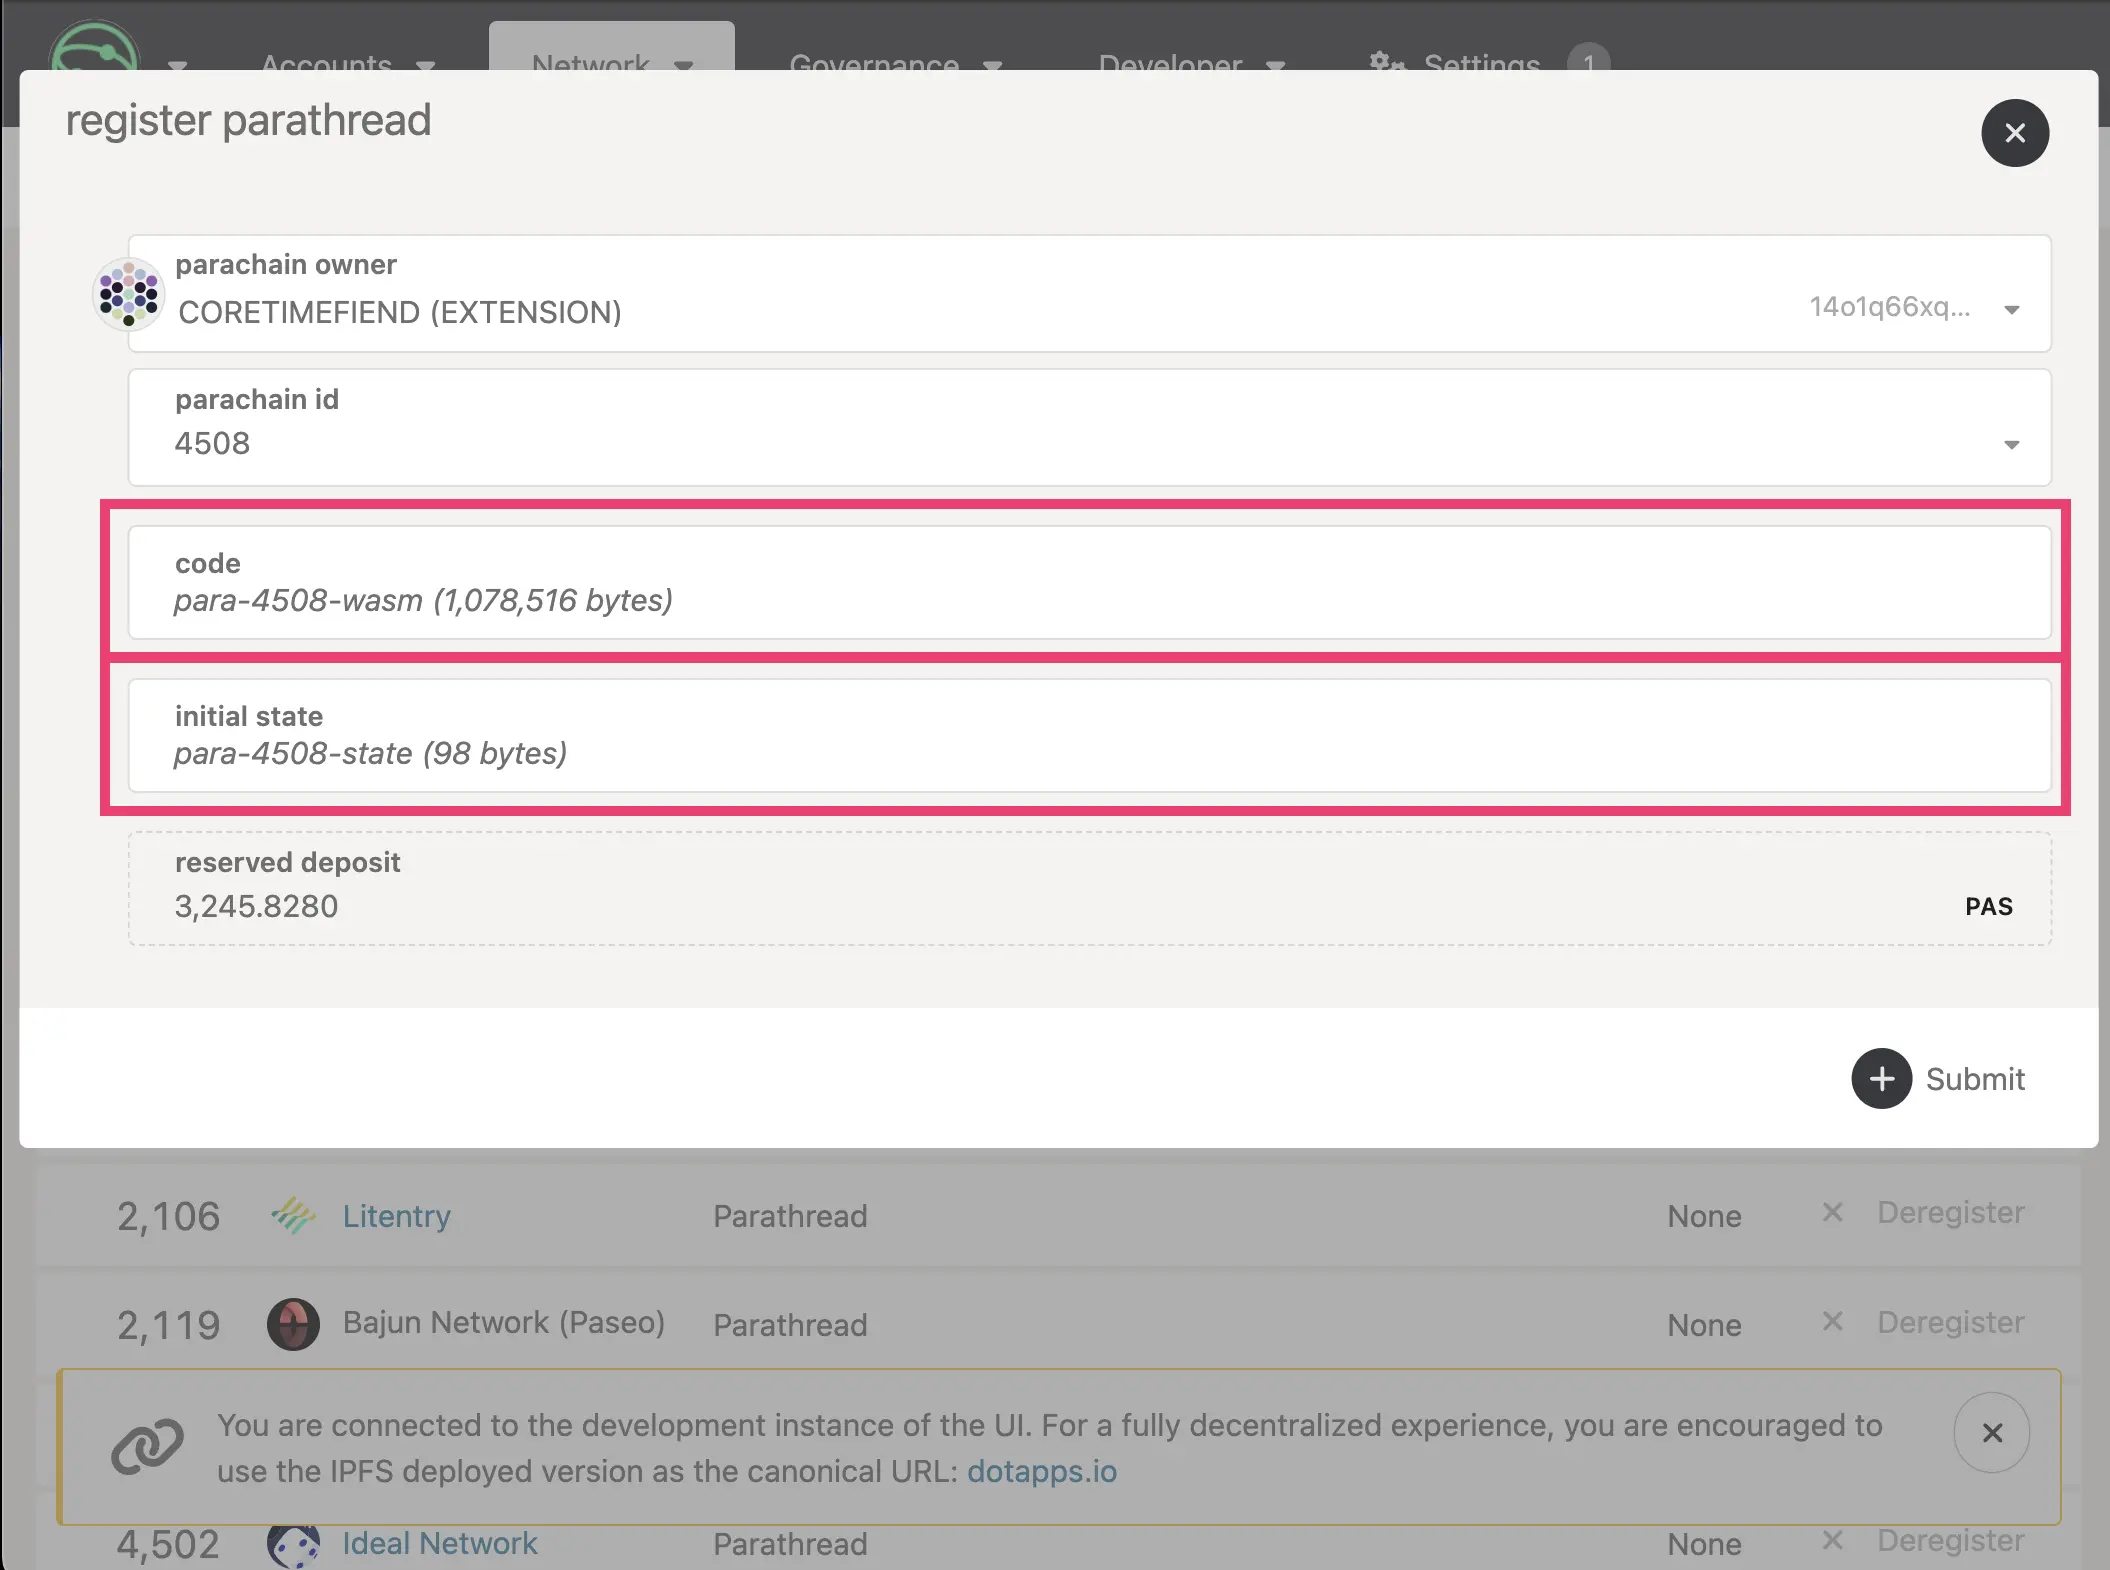
-
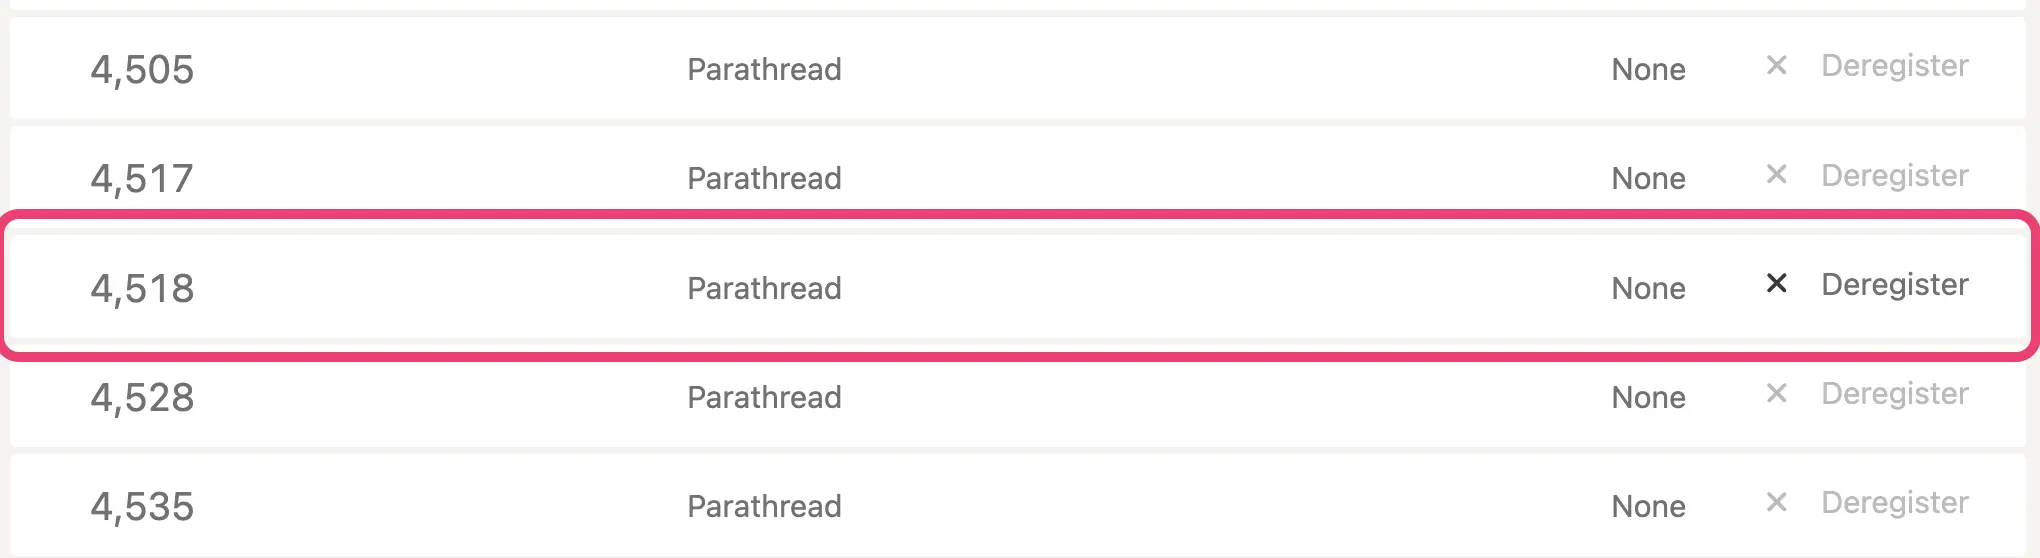
Confirm your details and + Submit button, where there should be a new Parathread with your parachain ID and an active Deregister button:
Your parachain's runtime logic and genesis are now part of the relay chain. The next step is to ensure you are able to run a collator to produce blocks for your parachain.
Note
You may need to wait several hours for your parachain to onboard. Until it has onboarded, you will be unable to purchase coretime, and therefore will not be able to perform transactions on your network.
Start the Collator Node
Before starting a collator, you need to generate a node key. This key is responsible for communicating with other nodes over Libp2p:
After running the command, you should see the following output, indicating the base path now has a suitable node key:
Generating key in "/data/chains/custom/network/secret_ed25519" 12D3KooWKGW964eG4fAwsNMFdckbj3GwhpmSGFU9dd8LFAVAa4EE
You must have the ports for the collator publicly accessible and discoverable to enable parachain nodes to peer with Paseo validator nodes to produce blocks. You can specify the ports with the --port command-line option. You can start the collator with a command similar to the following:
polkadot-omni-node --collator \
--chain raw_chain_spec.json \
--base-path data \
--port 40333 \
--rpc-port 8845 \
--force-authoring \
--node-key-file ./data/chains/custom/network/secret_ed25519 \
-- \
--sync warp \
--chain paseo \
--port 50343 \
--rpc-port 9988
In this example, the first --port setting specifies the port for the collator node, and the second --port specifies the embedded relay chain node port. The first --rpc-port setting specifies the port you can connect to the collator. The second --rpc-port specifies the port for connecting to the embedded relay chain.
Before proceeding, ensure that the collator node is running. Then, open a new terminal and insert your generated session key into the collator keystore by running the following command. Use the same port specified in the --rpc-port parameter when starting the collator node (8845 in this example) to connect to it. Replace INSERT_SECRET_PHRASE and INSERT_PUBLIC_KEY_HEX_FORMAT with the values from the session key you generated in the Generate Customs Keys for Your Collator section:
curl -H "Content-Type: application/json" \
--data '{
  "jsonrpc":"2.0",
  "method":"author_insertKey",
  "params":[
    "aura",
    "INSERT_SECRET_PHRASE",
    "INSERT_PUBLIC_KEY_HEX_FORMAT"
  ],
  "id":1
}' \
http://localhost:8845
If successful, you should see the following response:
Once your collator is synced with the Paseo relay chain, and your parathread finished onboarding, it will be ready to start producing blocks. This process may take some time.
Producing Blocks
With your parachain collator operational, the next step is acquiring coretime. This is essential for ensuring your parachain's security through the relay chain. Agile Coretime enhances Polkadot's resource management, offering developers greater economic adaptability. Once you have configured your parachain, you can follow two paths:
- Bulk coretime is purchased via the Broker pallet on the respective coretime system parachain. You can purchase bulk coretime on the coretime chain and assign the purchased core to the registered
ParaID - On-demand coretime is ordered via the
OnDemandAssignmentpallet, which is located on the respective relay chain
Once coretime is correctly assigned to your parachain, whether bulk or on-demand, blocks should be produced (provided your collator is running).
For more information on coretime, refer to the Coretime documentation.
Where to Go Next
-
Tutorial Obtain Coretime
Get coretime for block production now! Follow this guide to explore on-demand and bulk options for seamless and efficient operations.
| Created: July 28, 2025