Opening HRMP Channels Between Parachains
Introduction
For establishing communication channels between parachains on the Polkadot network using the Horizontal Relay-routed Message Passing (HRMP) protocol, the following steps are required:
- Channel request - the parachain that wants to open an HRMP channel must make a request to the parachain it wishes to have an open channel with
- Channel acceptance - the other parachain must then accept this request to complete the channel establishment
This process results in a unidirectional HRMP channel, where messages can flow in only one direction between the two parachains.
An additional HRMP channel must be established in the opposite direction to enable bidirectional communication. This requires repeating the request and acceptance process but with the parachains reversing their roles.
Once both unidirectional channels are established, the parachains can send messages back and forth freely through the bidirectional HRMP communication channel.
Prerequisites
Before proceeding, ensure you meet the following requirements:
- Blockchain network with a relay chain and at least two connected parachains
- Wallet with sufficient funds to execute transactions on the participant chains
Procedure for Initiating HRMP Channel Setup
This example will demonstrate how to open a channel between parachain 2500 and parachain 2600, using Rococo Local as the relay chain.
Step 1 - Fund Sender Sovereign Account
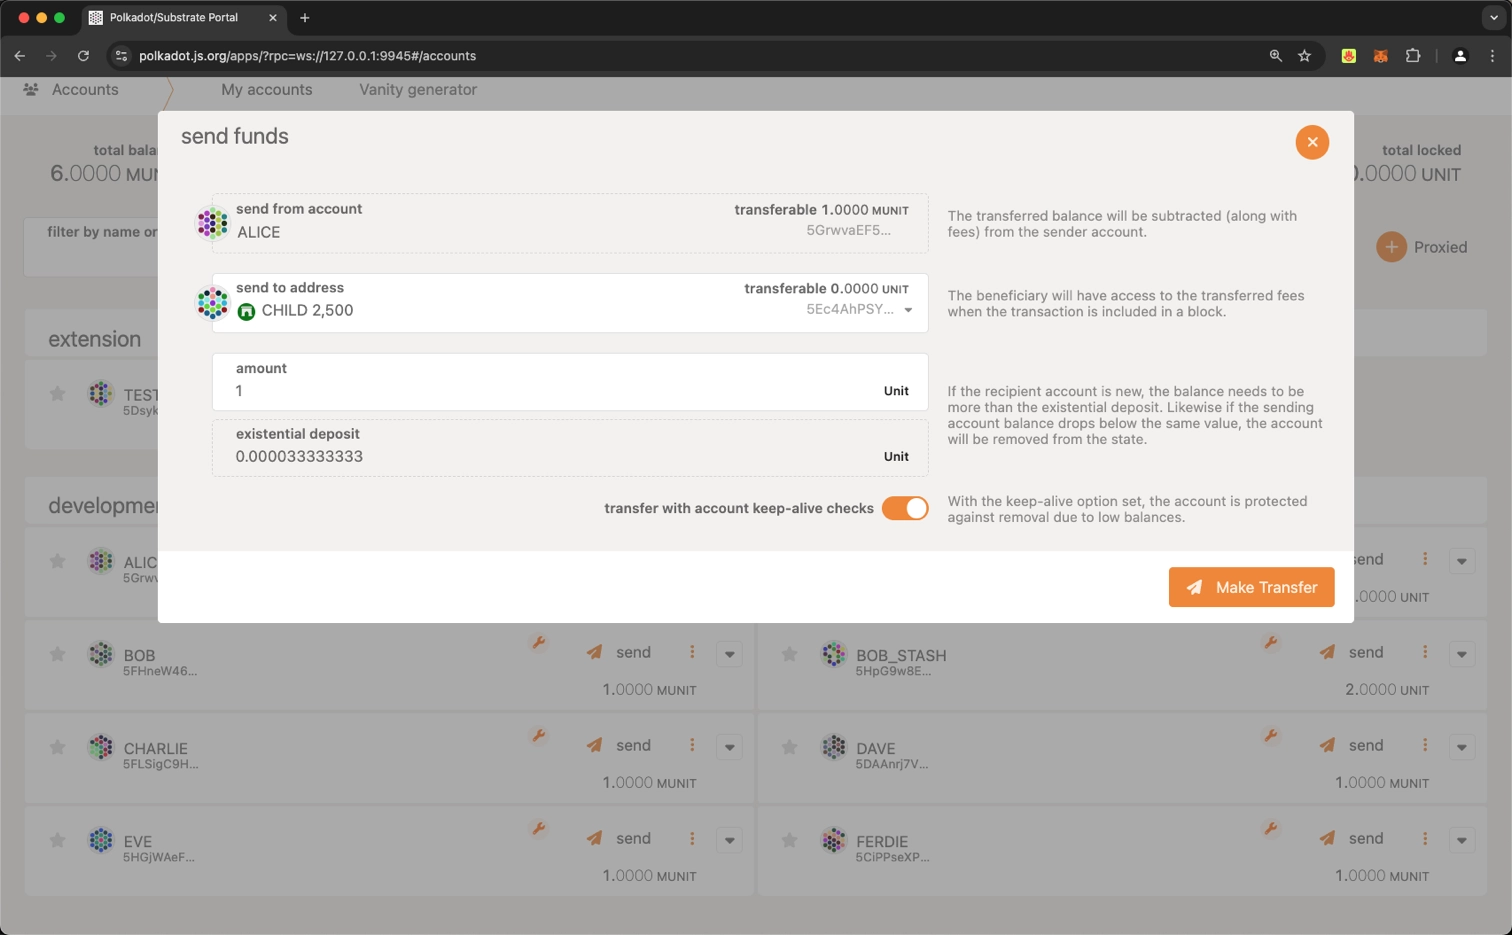
The sovereign account for parachain 2500 on the relay chain must be funded so it can take care of any XCM transact fees.
Use Polkadot.js Apps UI to connect to the relay chain and transfer funds from your account to the parachain 2500 sovereign account.
Calculating Parachain Sovereign Account
To generate the sovereign account address for a parachain, you'll need to follow these steps:
-
Determine if the parachain is an "up/down" chain (parent or child) or a "sibling" chain:
-
Up/down chains use the prefix
0x70617261(which decodes tob"para") -
Sibling chains use the prefix
0x7369626c(which decodes tob"sibl")
-
-
Calculate the u32 scale encoded value of the parachain ID:
- Parachain 2500 would be encoded as
c4090000
- Parachain 2500 would be encoded as
-
Combine the prefix and parachain ID encoding to form the full sovereign account address:
The sovereign account of parachain 2500 in relay chain will be
0x70617261c4090000000000000000000000000000000000000000000000000000and the SS58 format of this address is5Ec4AhPSY2GEE4VoHUVheqv5wwq2C1HMKa7c9fVJ1WKivX1Y
To perform this conversion, you can also use the "Para ID" to Address section in Substrate Utilities.
Step 2 - Create Channel Opening Extrinsic
-
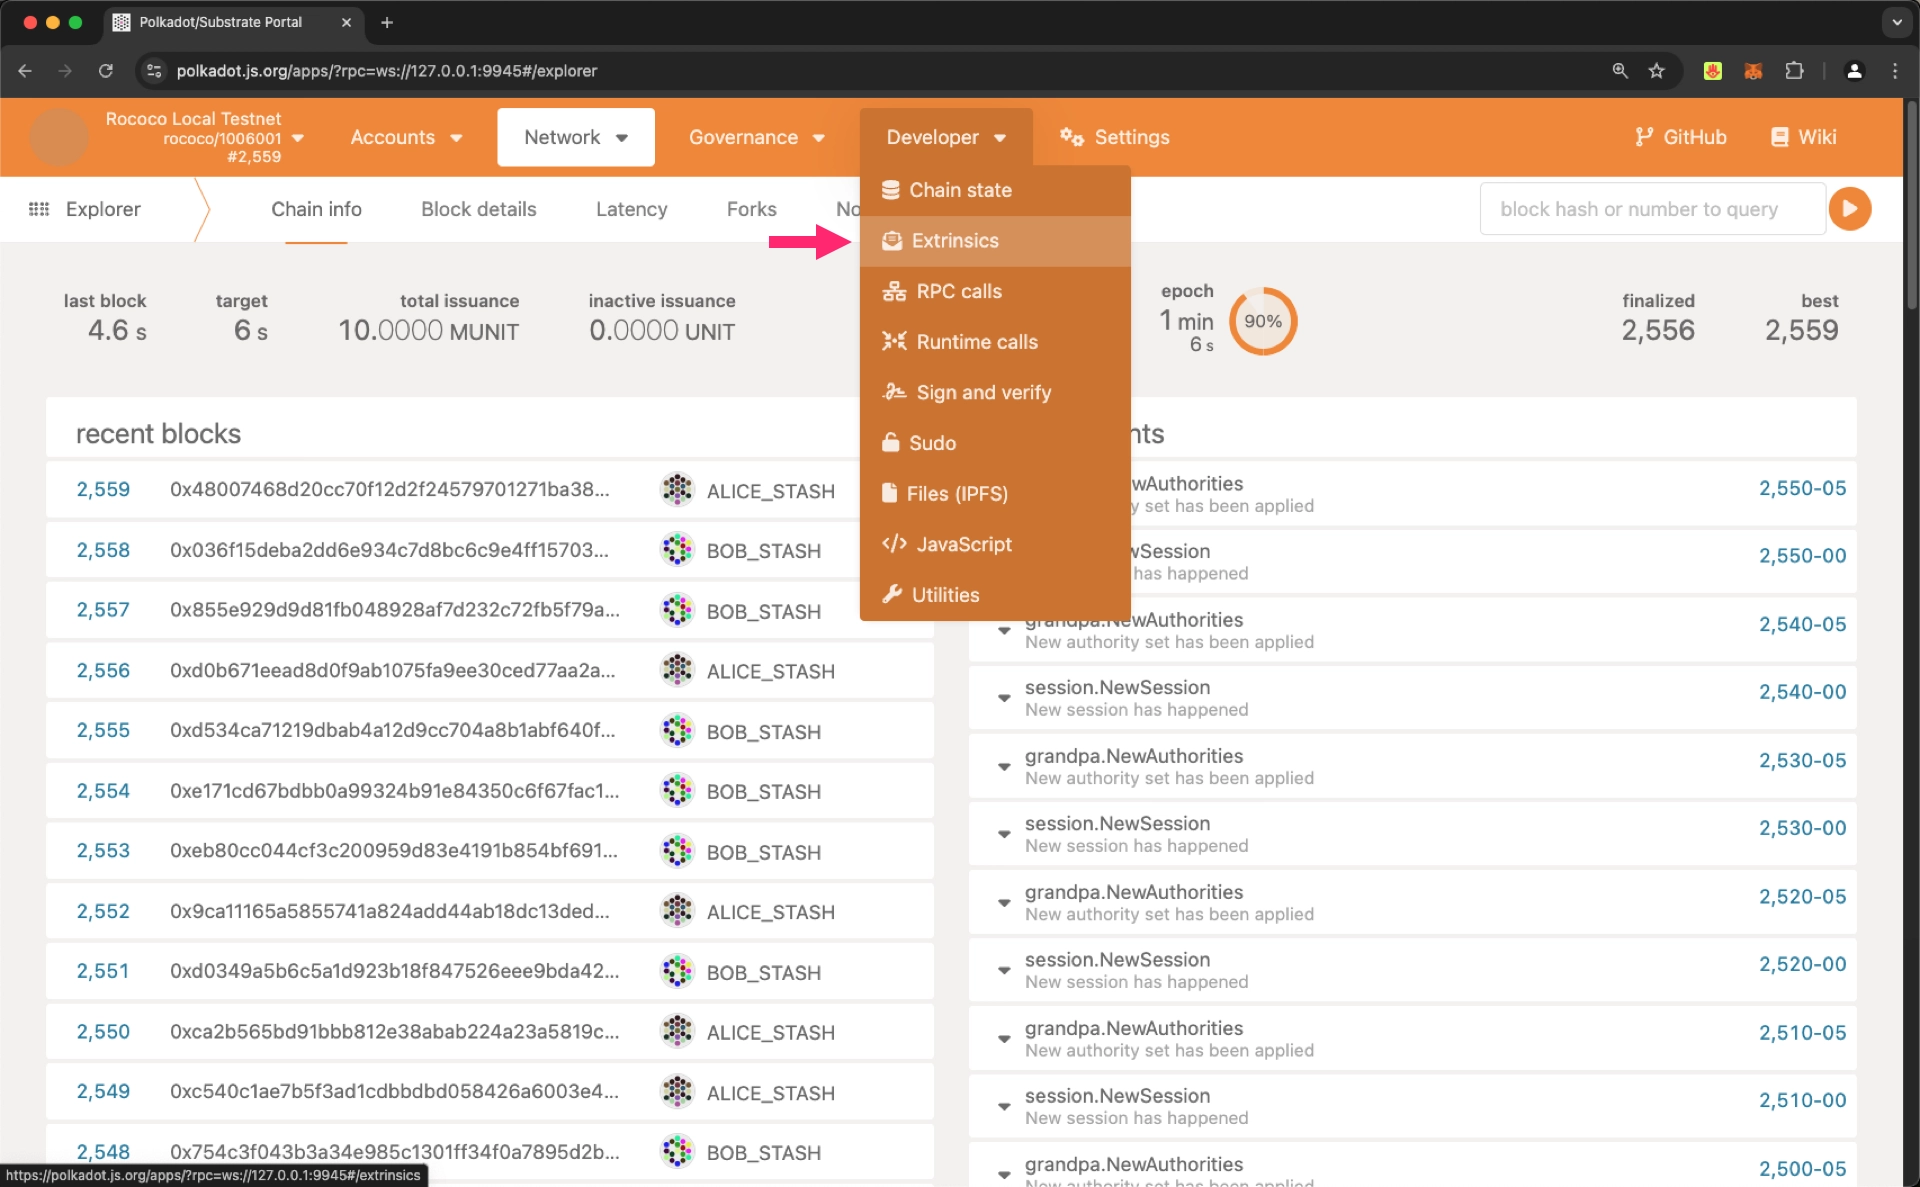
In Polkadot.js Apps, connect to the relay chain, navigate to the Developer dropdown and select the Extrinsics option
-
Construct an
hrmpInitOpenChannelextrinsic call- Select the
hrmppallet - Choose the
hrmpInitOpenChannelextrinsic - Fill in the parameters
recipient- parachain ID of the target chain (in this case, 2600)proposedMaxCapacity- max number of messages that can be pending in the channel at onceproposedMaxMessageSize- max message size that could be put into the channel
- Copy the encoded call data
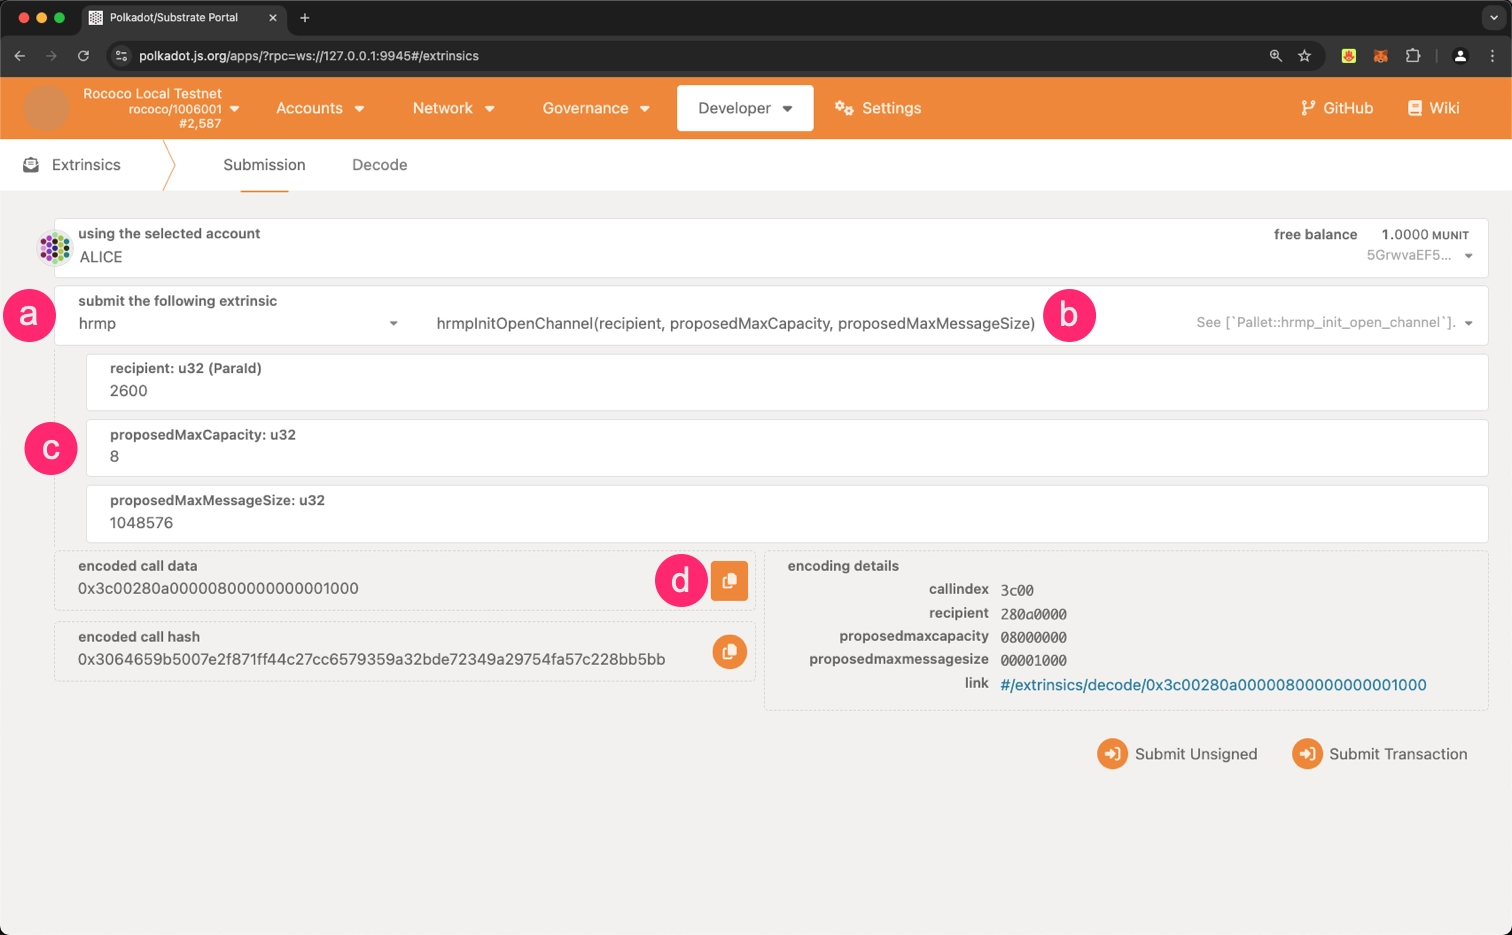 The encoded call data for opening a channel with parachain 2600 is
 0x3c00280a00000800000000001000.
- Select the
Step 3 - Crafting and Submitting the XCM Message from the Sender
To initiate the HRMP channel opening process, you need to create an XCM message that includes the encoded hrmpInitOpenChannel call data from the previous step. This message will be sent from your parachain to the relay chain.
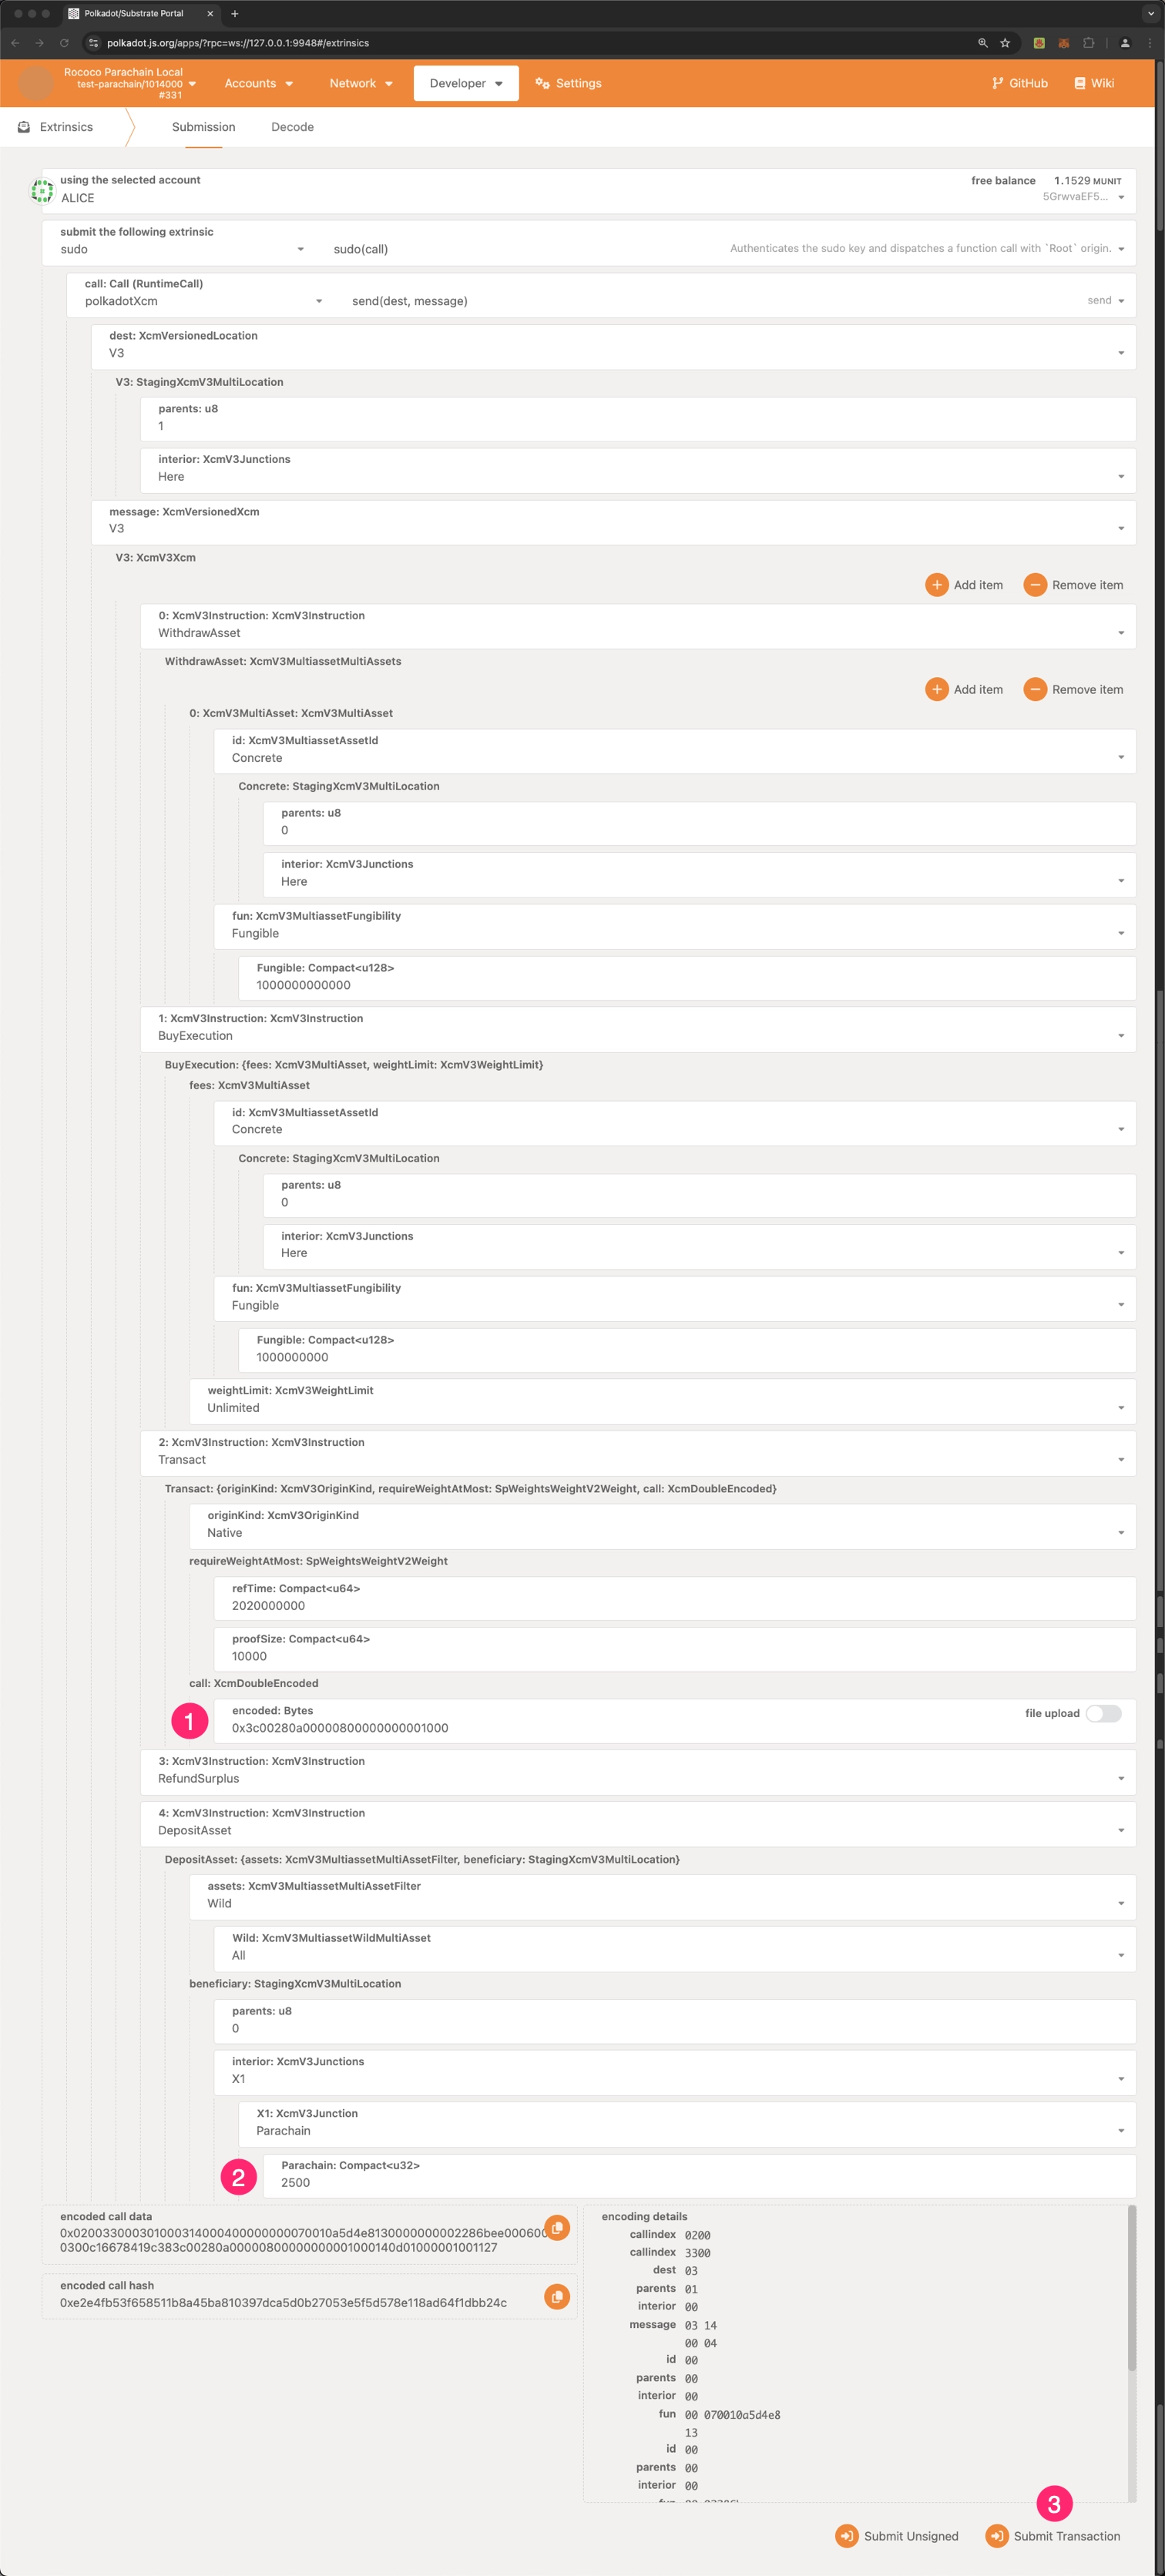
This example uses the sudo pallet to dispatch the extrinsic. Verify the XCM configuration of the parachain you're working with and ensure you're using an origin with the necessary privileges to execute the polkadotXcm.send extrinsic.
The XCM message should contain the following instructions:
WithdrawAsset- withdraws assets from the origin's ownership and places them in the Holding RegisterBuyExecution- pays for the execution of the current message using the assets in the Holding RegisterTransact- execute the encoded transaction callRefundSurplus- increases the Refunded Weight Register to the value of the Surplus Weight Register, attempting to reclaim any excess fees paid via BuyExecutionDepositAsset- subtracts assets from the Holding Register and deposits equivalent on-chain assets under the specified beneficiary's ownership
Note
For more detailed information about XCM's functionality, complexities, and instruction set, refer to the xcm-format documentation.
In essence, this process withdraws funds from the parachain's sovereign account to the XCVM Holding Register, then uses these funds to purchase execution time for the XCM Transact instruction, executes Transact, refunds any unused execution time and deposits any remaining funds into a specified account.
To send the XCM message to the relay chain, connect to parachain 2500 in Polkadot.js Apps. Fill in the required parameters as shown in the image below, ensuring that you:
- Replace the
callfield with your encodedhrmpInitOpenChannelcall data from the previous step - Use the correct beneficiary information
- Click the Submit Transaction button to dispatch the XCM message to the relay chain
Note
The exact process and parameters for submitting this XCM message may vary depending on your specific parachain and relay chain configurations. Always refer to the most current documentation for your particular network setup.
After submitting the XCM message to initiate the HRMP channel opening, you should verify that the request was successful. Follow these steps to check the status of your channel request:
-
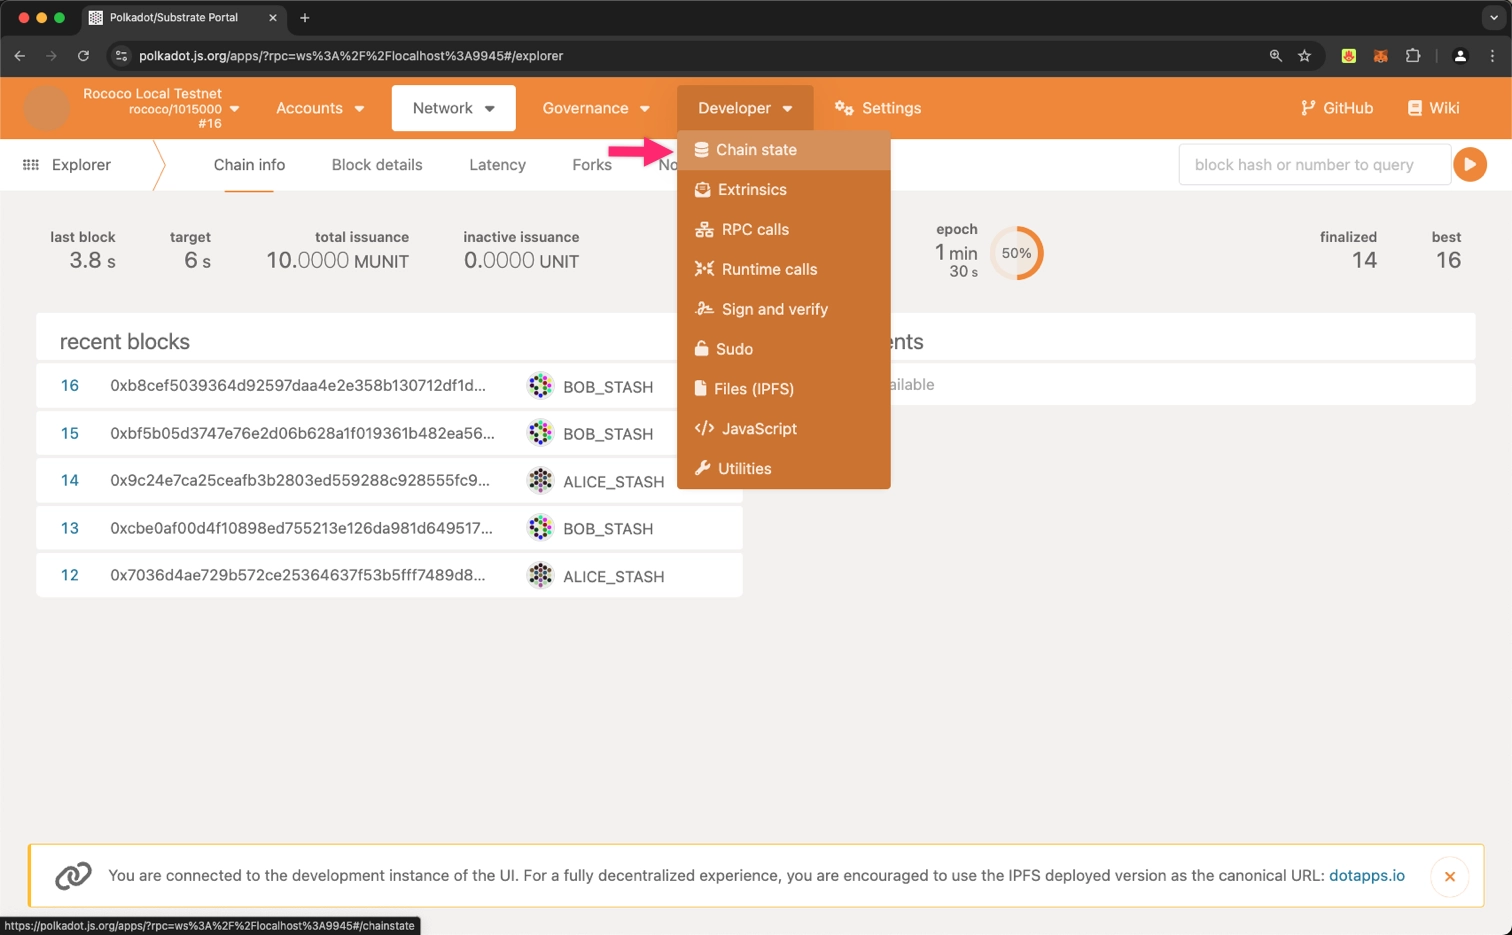
Using Polkadot.js Apps, connect to the relay chain and navigate to the Developer dropdown, then select the Chain state option
-
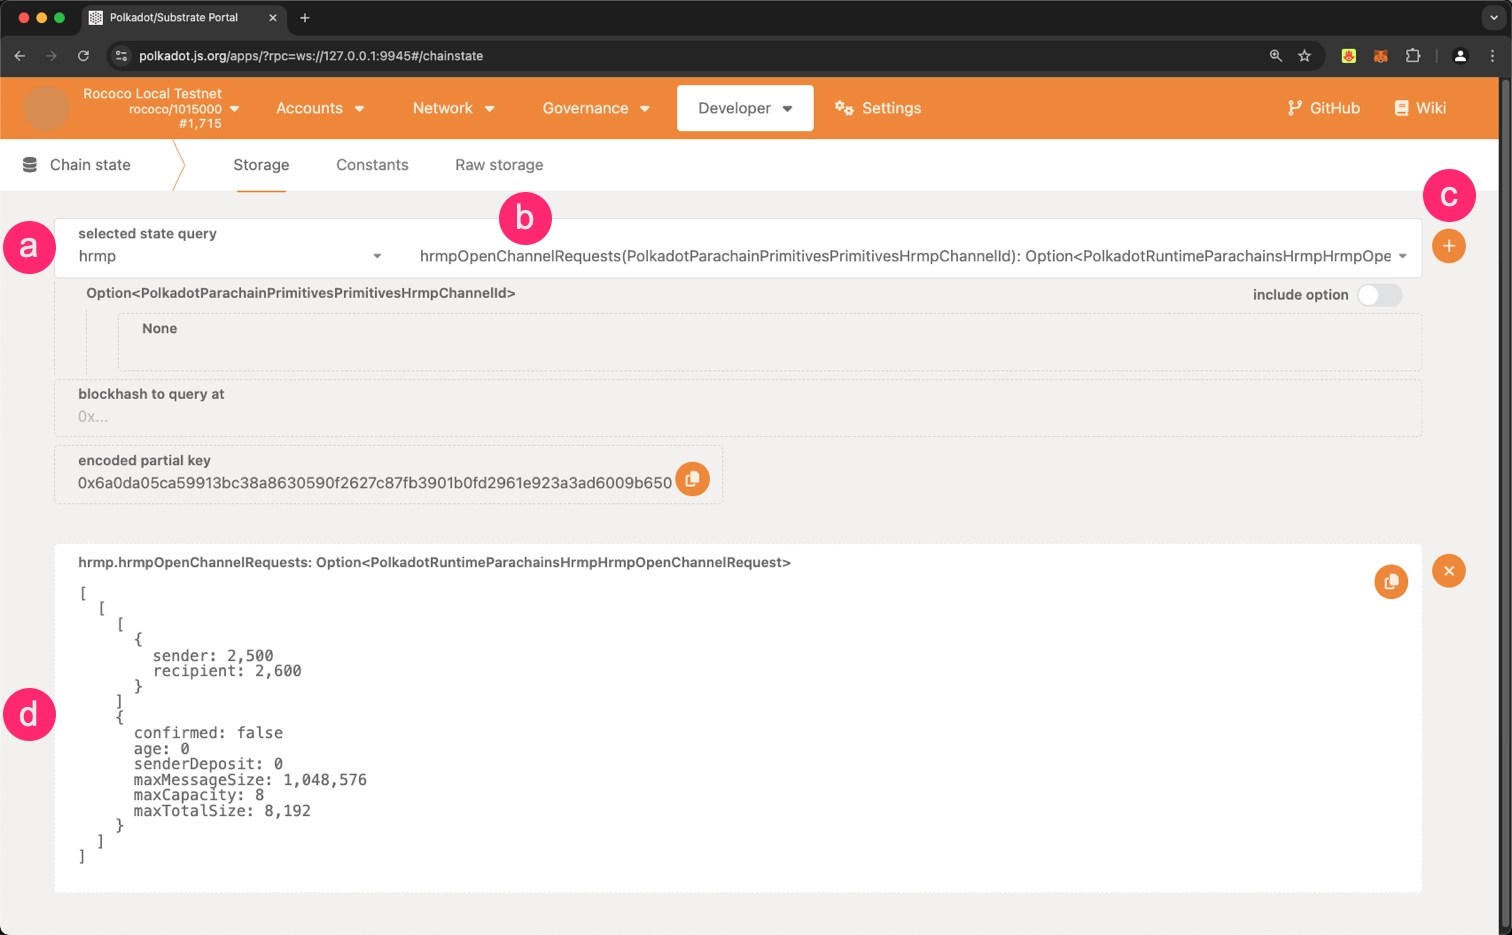
Query the HRMP open channel requests
- Select
hrmp - Choose the
hrmpOpenChannelRequestscall - Click the + button to execute the query
- Check the status of all pending channel requests
- Select
If your channel request was successful, you should see an entry for your parachain ID in the list of open channel requests. This confirms that your request has been properly registered on the relay chain and is awaiting acceptance by the target parachain.
Procedure for Accepting HRMP Channel
For the channel to be fully established, the target parachain must accept the channel request by submitting an XCM message to the relay chain.
Step 1 - Fund Receiver Sovereign Account
Before proceeding, ensure that the sovereign account of parachain 2600 on the relay chain is funded. This account will be responsible for covering any XCM transact fees. To fund the account, follow the same process described in the previous section Step 1 - Fund Sovereign Account.
Step 2 - Create Channel Accepting Extrinsic
-
In Polkadot.js Apps, connect to the relay chain, navigate to the Developer dropdown and select the Extrinsics option

-
Construct an
hrmpAcceptOpenChannelextrinsic call- Select the
hrmppallet - Choose the
hrmpAcceptOpenChannelextrinsic - Fill in the parameters:
sender- parachain ID of the requesting chain (in this case, 2500)
- Copy the encoded call data
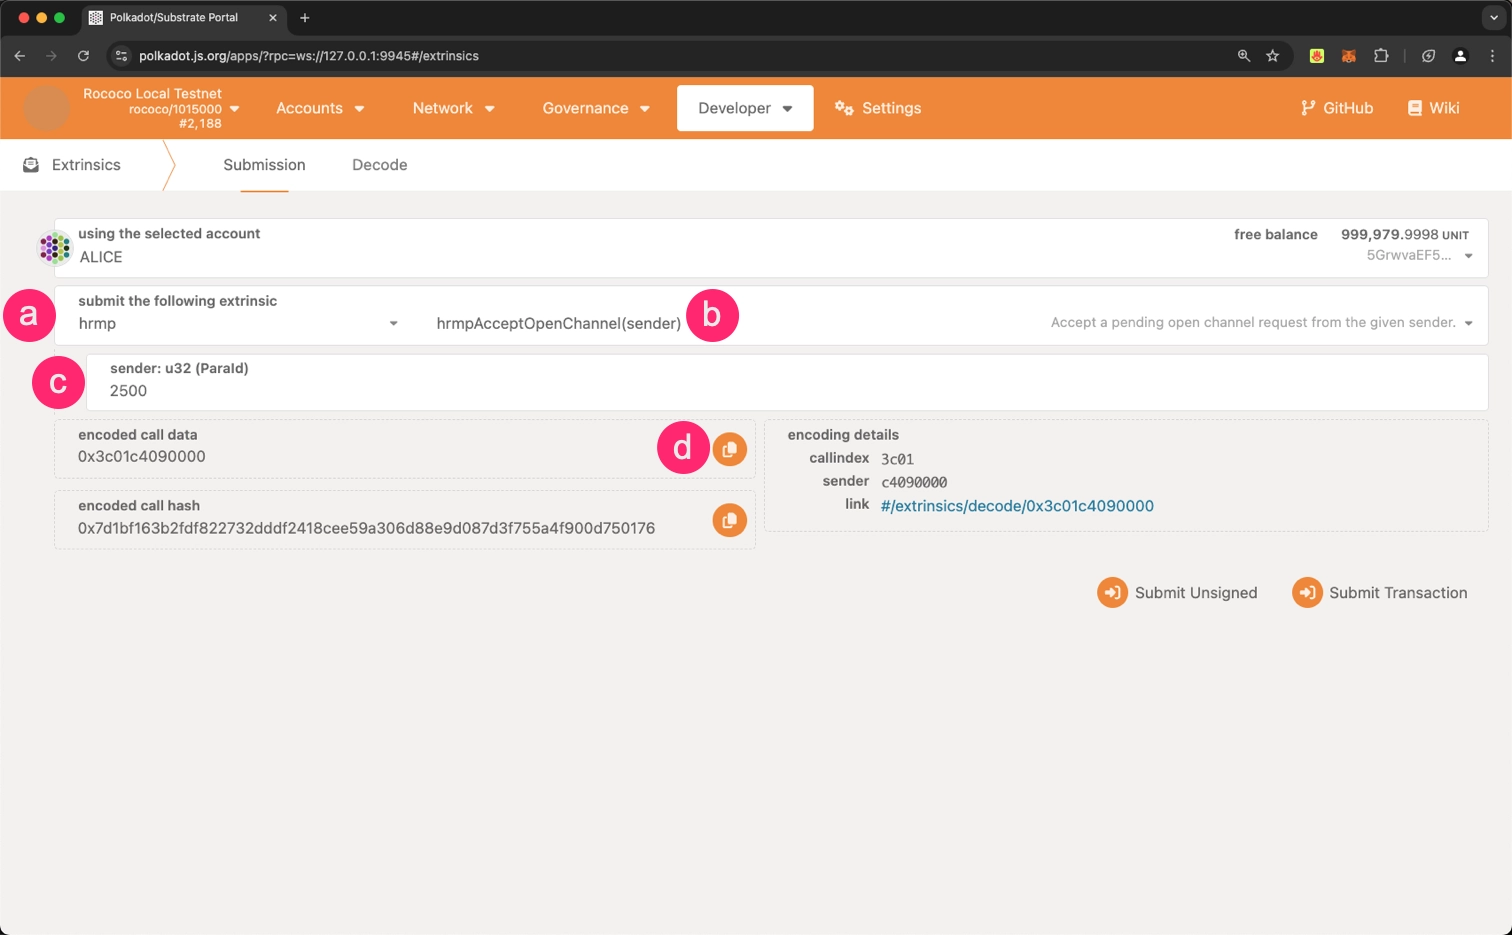 The encoded call data for accepting a channel with parachain 2500 should be
 0x3c01c4090000
- Select the
Step 3 - Crafting and Submitting the XCM Message from the Receiver
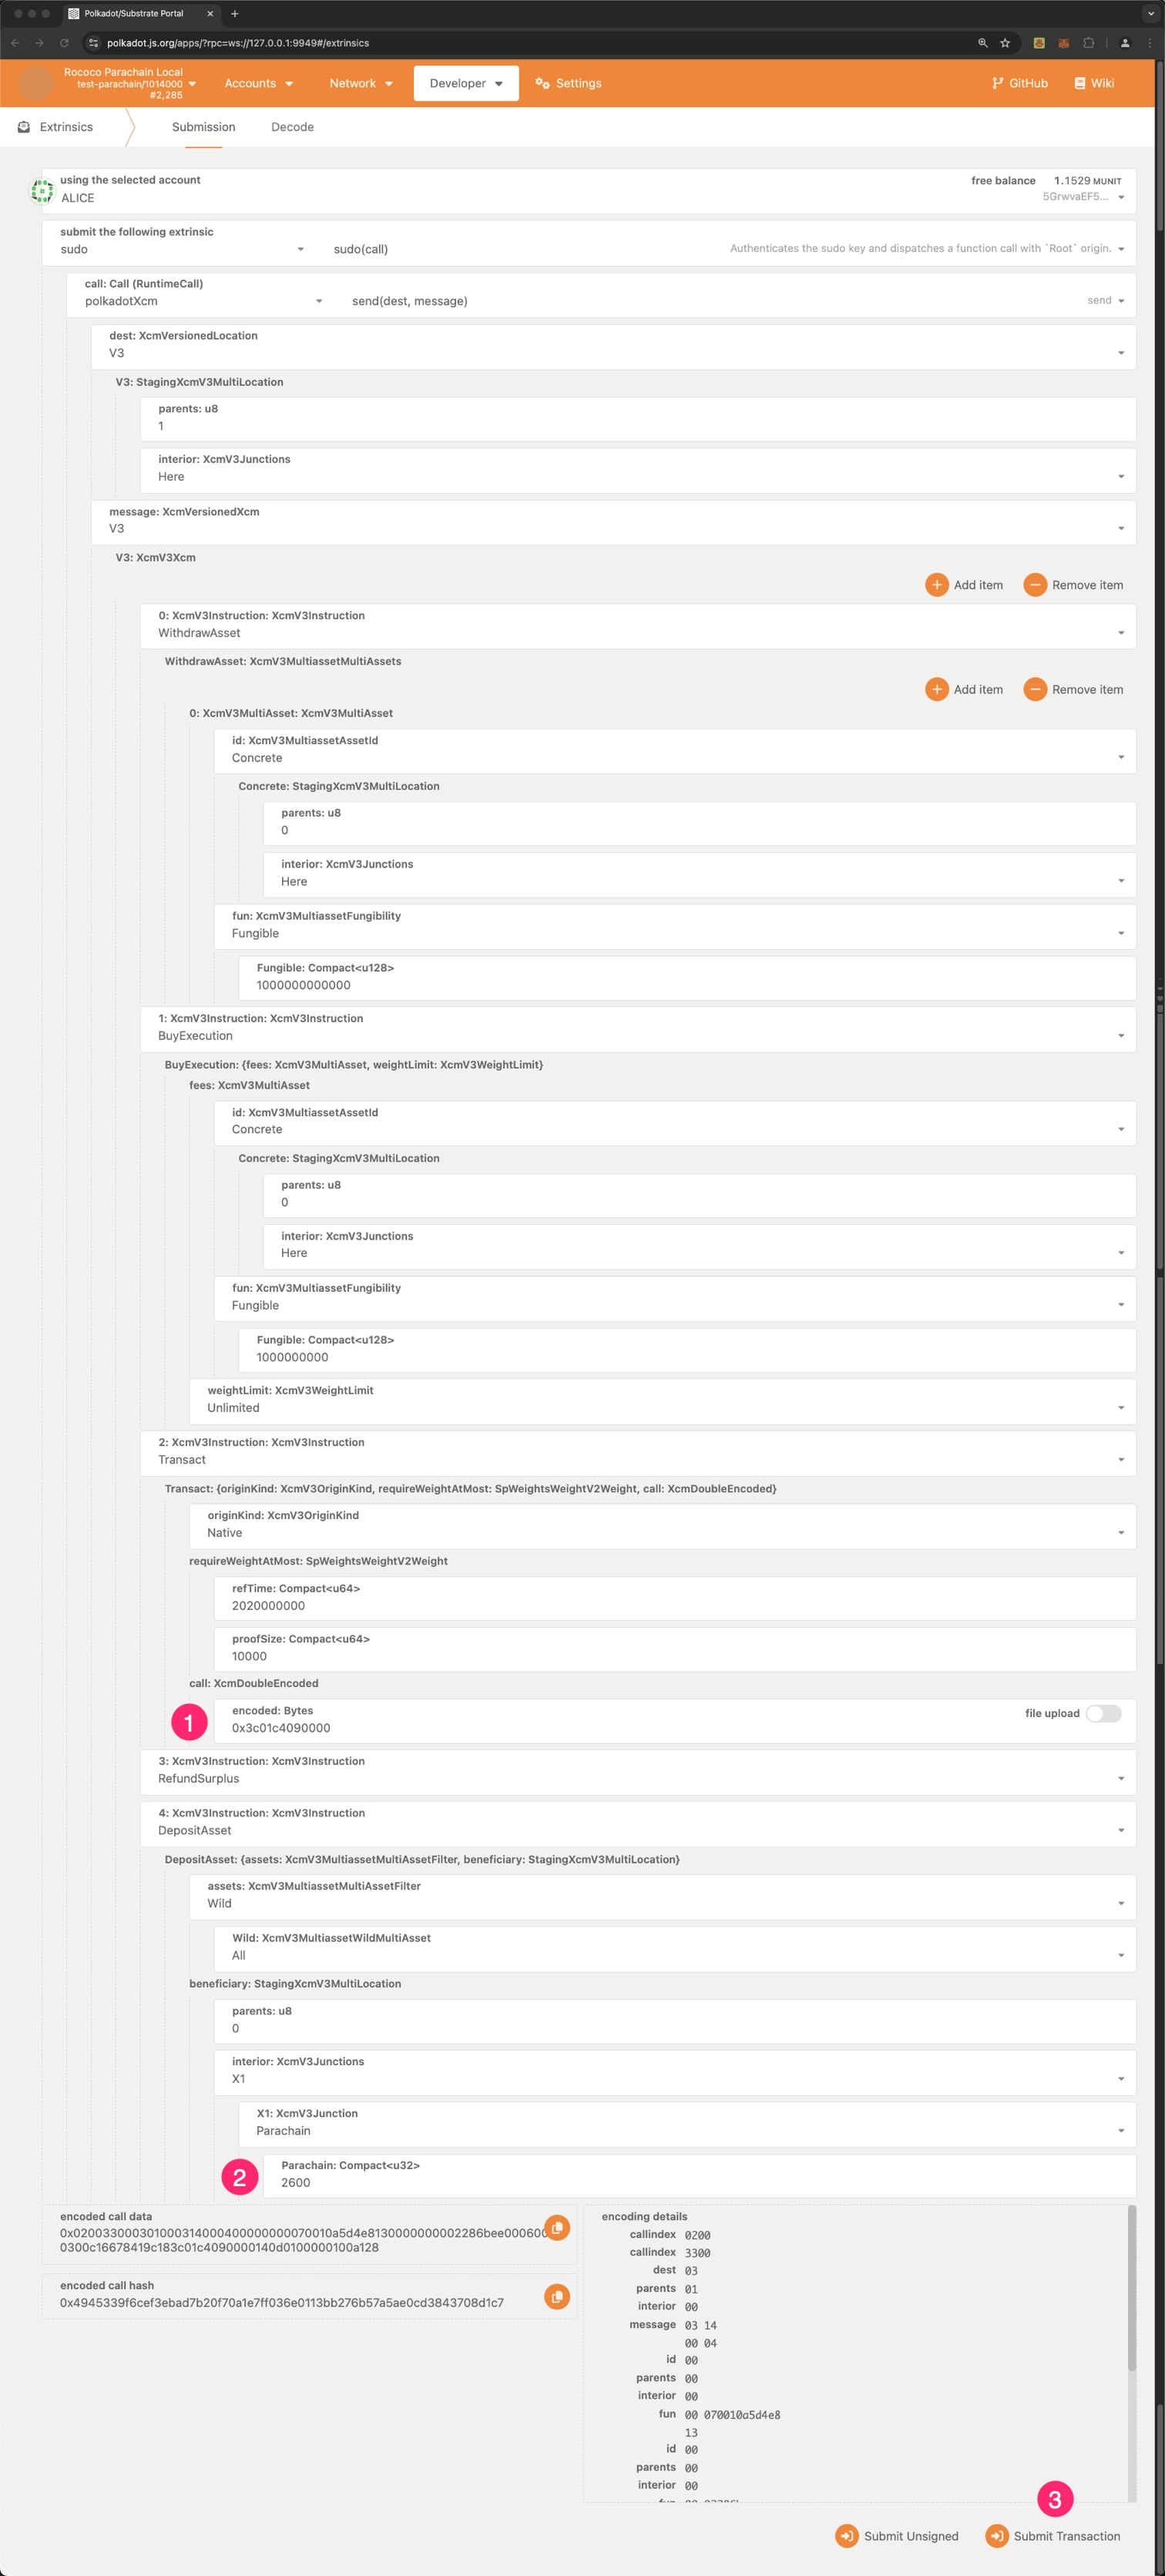
To accept the HRMP channel opening, you need to create and submit an XCM message that includes the encoded hrmpAcceptOpenChannel call data from the previous step. This process is similar to the one described in the previous section's Step 3 - Crafting and Submitting the XCM Message, with a few key differences:
- Use the encoded call data for
hrmpAcceptOpenChannelobtained in Step 2 of this section - In the last XCM instruction (DepositAsset), set the beneficiary to parachain 2600's sovereign account to receive any surplus funds
To send the XCM message to the relay chain, connect to parachain 2600 in Polkadot.js Apps. Fill in the required parameters as shown in the image below, ensuring that you:
- Replace the
callfield with your encodedhrmpAcceptOpenChannelcall data from the previous step - Use the correct beneficiary information
- Click the Submit Transaction button to dispatch the XCM message to the relay chain
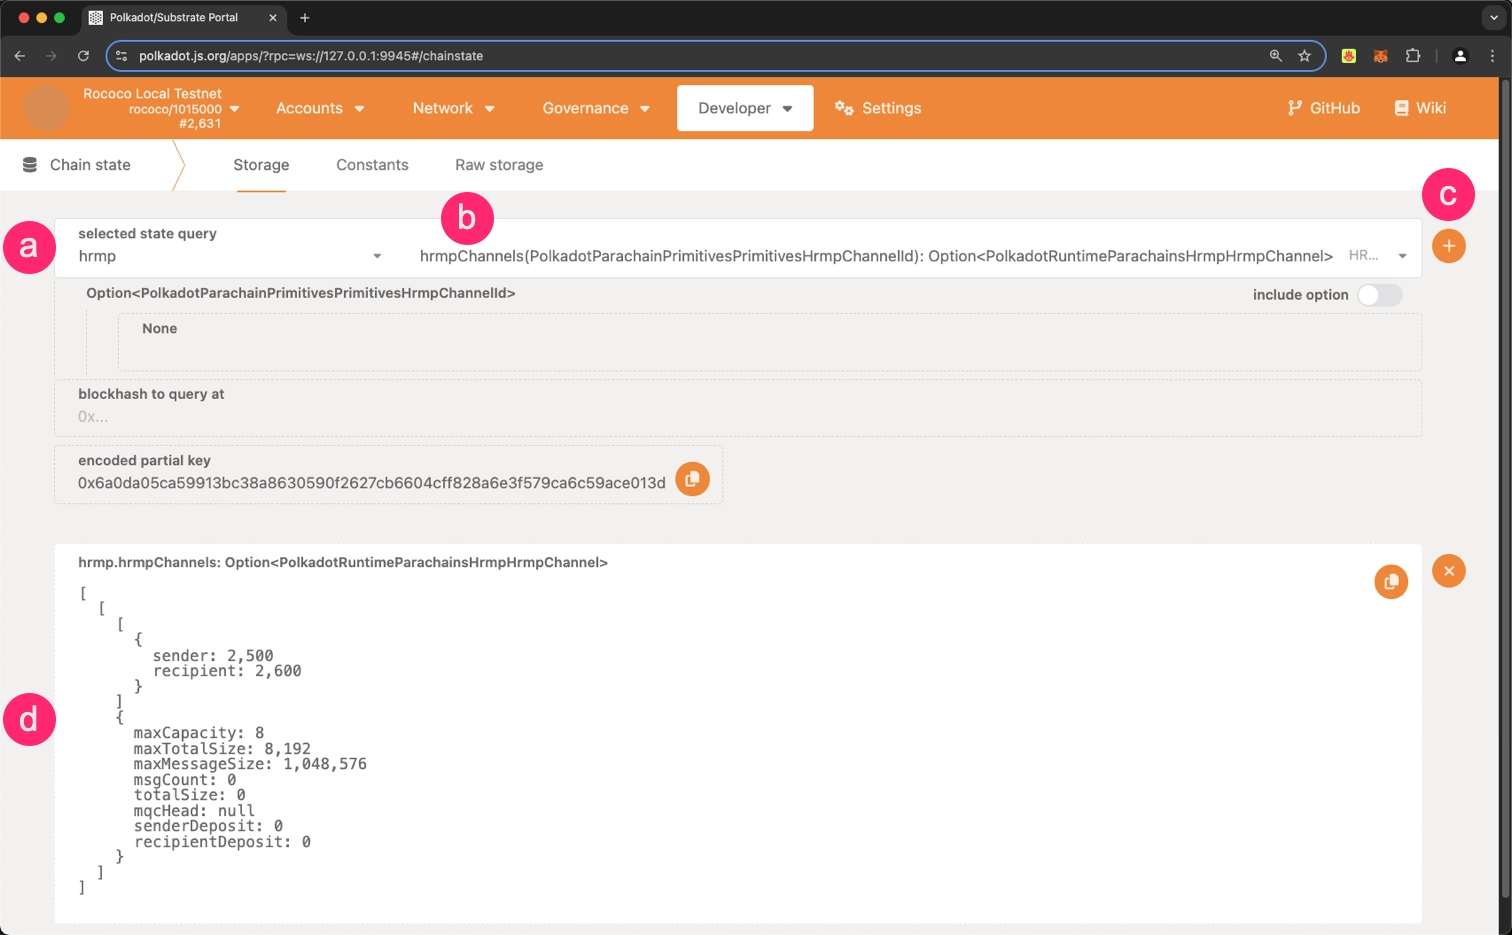
After submitting the XCM message to accept the HRMP channel opening, verify that the channel has been set up correctly.
-
Using Polkadot.js Apps, connect to the relay chain and navigate to the Developer dropdown, then select the Chain state option

-
Query the HRMP channels
- Select
hrmp - Choose the
hrmpChannelscall - Click the + button to execute the query
- Check the status of the opened channel
- Select
If the channel has been successfully established, you should see the channel details in the query results.
By following these steps, you will have successfully accepted the HRMP channel request and established a unidirectional channel between the two parachains.
Note
Remember that for full bidirectional communication, you'll need to repeat this process in the opposite direction, with parachain 2600 initiating a channel request to parachain 2500.