Register a Foreign Asset on Asset Hub
Introduction
As outlined in the Asset Hub Overview, Asset Hub supports two categories of assets: local and foreign. Local assets are created on the Asset Hub system parachain and are identified by integer IDs. On the other hand, foreign assets, which originate outside of Asset Hub, are recognized by Multilocations.
When registering a foreign asset on Asset Hub, it's essential to notice that the process involves communication between two parachains. The Asset Hub parachain will be the destination of the foreign asset, while the source parachain will be the origin of the asset. The communication between the two parachains is facilitated by the Cross-Chain Message Passing (XCMP) protocol.
This guide will take you through the process of registering a foreign asset on the Asset Hub parachain.
Prerequisites
The Asset Hub parachain is one of the system parachains on a relay chain, such as Polkadot or Kusama. To interact with these parachains, you can use the Polkadot.js Apps interface for:
For testing purposes, you can also interact with the Asset Hub instance on the following test networks:
Before you start, ensure that you have:
- Access to the Polkadot.js Apps interface, and you are connected to the desired chain
- A parachain that supports the XCMP protocol to interact with the Asset Hub parachain
- A funded wallet to pay for the transaction fees and subsequent registration of the foreign asset
This guide will use Polkadot, its local Asset Hub instance, and the Astar parachain (ID 2006), as stated in the Test Environment Setup section. However, the process is the same for other relay chains and their respective Asset Hub parachain, regardless of the network you are using and the parachain owner of the foreign asset.
Steps to Register a Foreign Asset
Asset Hub
-
Open the Polkadot.js Apps interface and connect to the Asset Hub parachain using the network selector in the top left corner
- Testing foreign asset registration is recommended on TestNet before proceeding to MainNet. If you haven't set up a local testing environment yet, consult the Environment setup guide. After setting up, connect to the Local Node (Chopsticks) at
ws://127.0.0.1:8000 - For live network operations, connect to the Asset Hub parachain. You can choose either Polkadot or Kusama Asset Hub from the dropdown menu, selecting your preferred RPC provider.
- Testing foreign asset registration is recommended on TestNet before proceeding to MainNet. If you haven't set up a local testing environment yet, consult the Environment setup guide. After setting up, connect to the Local Node (Chopsticks) at
-
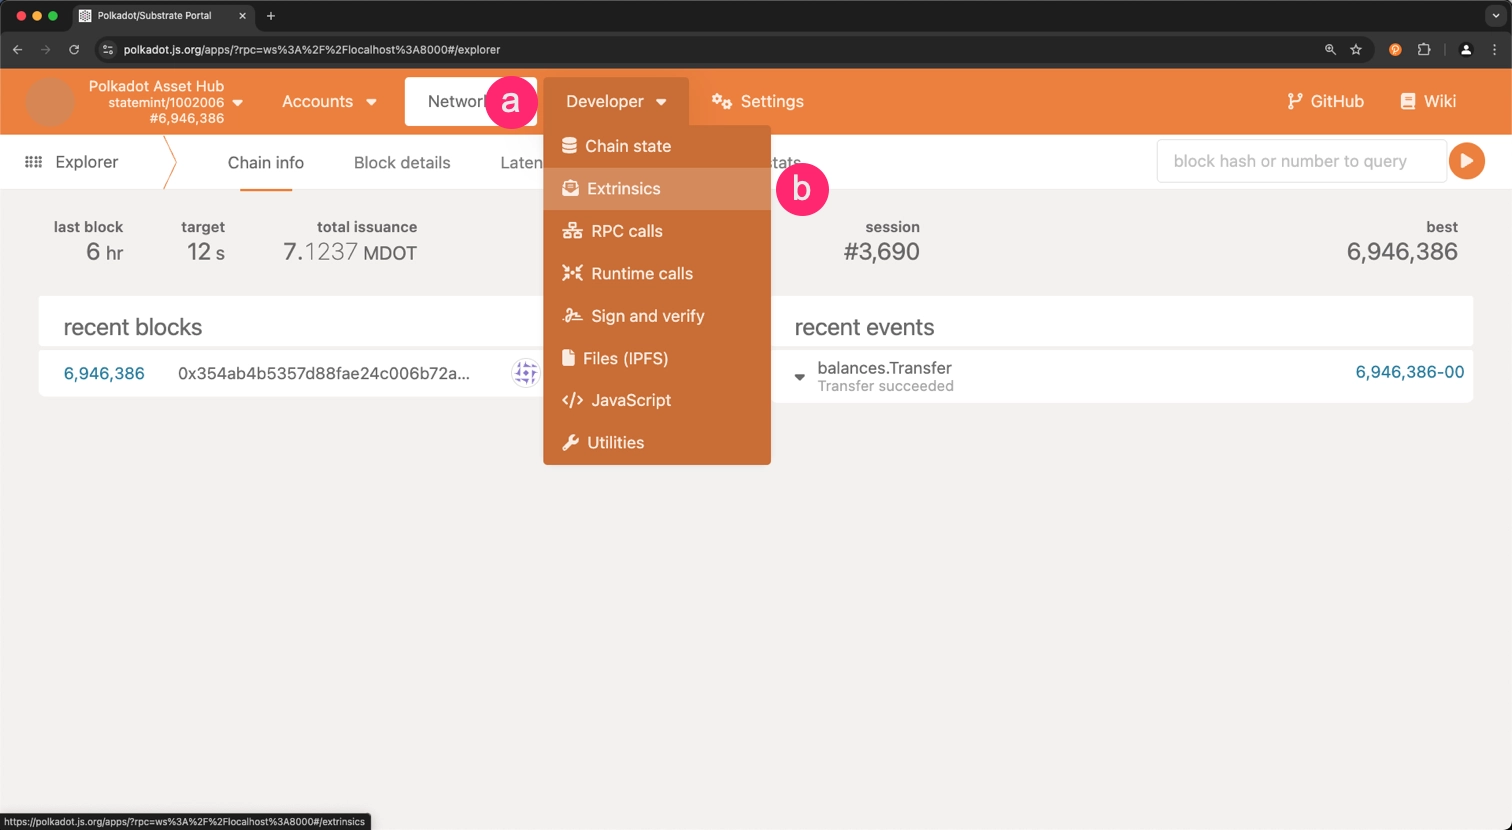
Navigate to the Extrinsics page
- Click on the Developer tab from the top navigation bar
- Select Extrinsics from the dropdown
-
Select the Foreign Assets pallet
- Select the
foreignAssetspallet from the dropdown list - Choose the
createextrinsic

- Select the
-
Fill out the required fields and click on the copy icon to copy the encoded call data to your clipboard. The fields to be filled are:
-
id - as this is a foreign asset, the ID will be represented by a Multilocation that reflects its origin. For this case, the Multilocation of the asset will be from the source parachain perspective:
-
admin - refers to the account that will be the admin of this asset. This account will be able to manage the asset, including updating its metadata. As the registered asset corresponds to a native asset of the source parachain, the admin account should be the sovereign account of the source parachain
Obtain the sovereign account
The sovereign account can be obtained through Substrate Utilities.
Ensure that Sibling is selected and that the Para ID corresponds to the source parachain. In this case, since the guide follows the test setup stated in the Test Environment Setup section, the Para ID is
2006.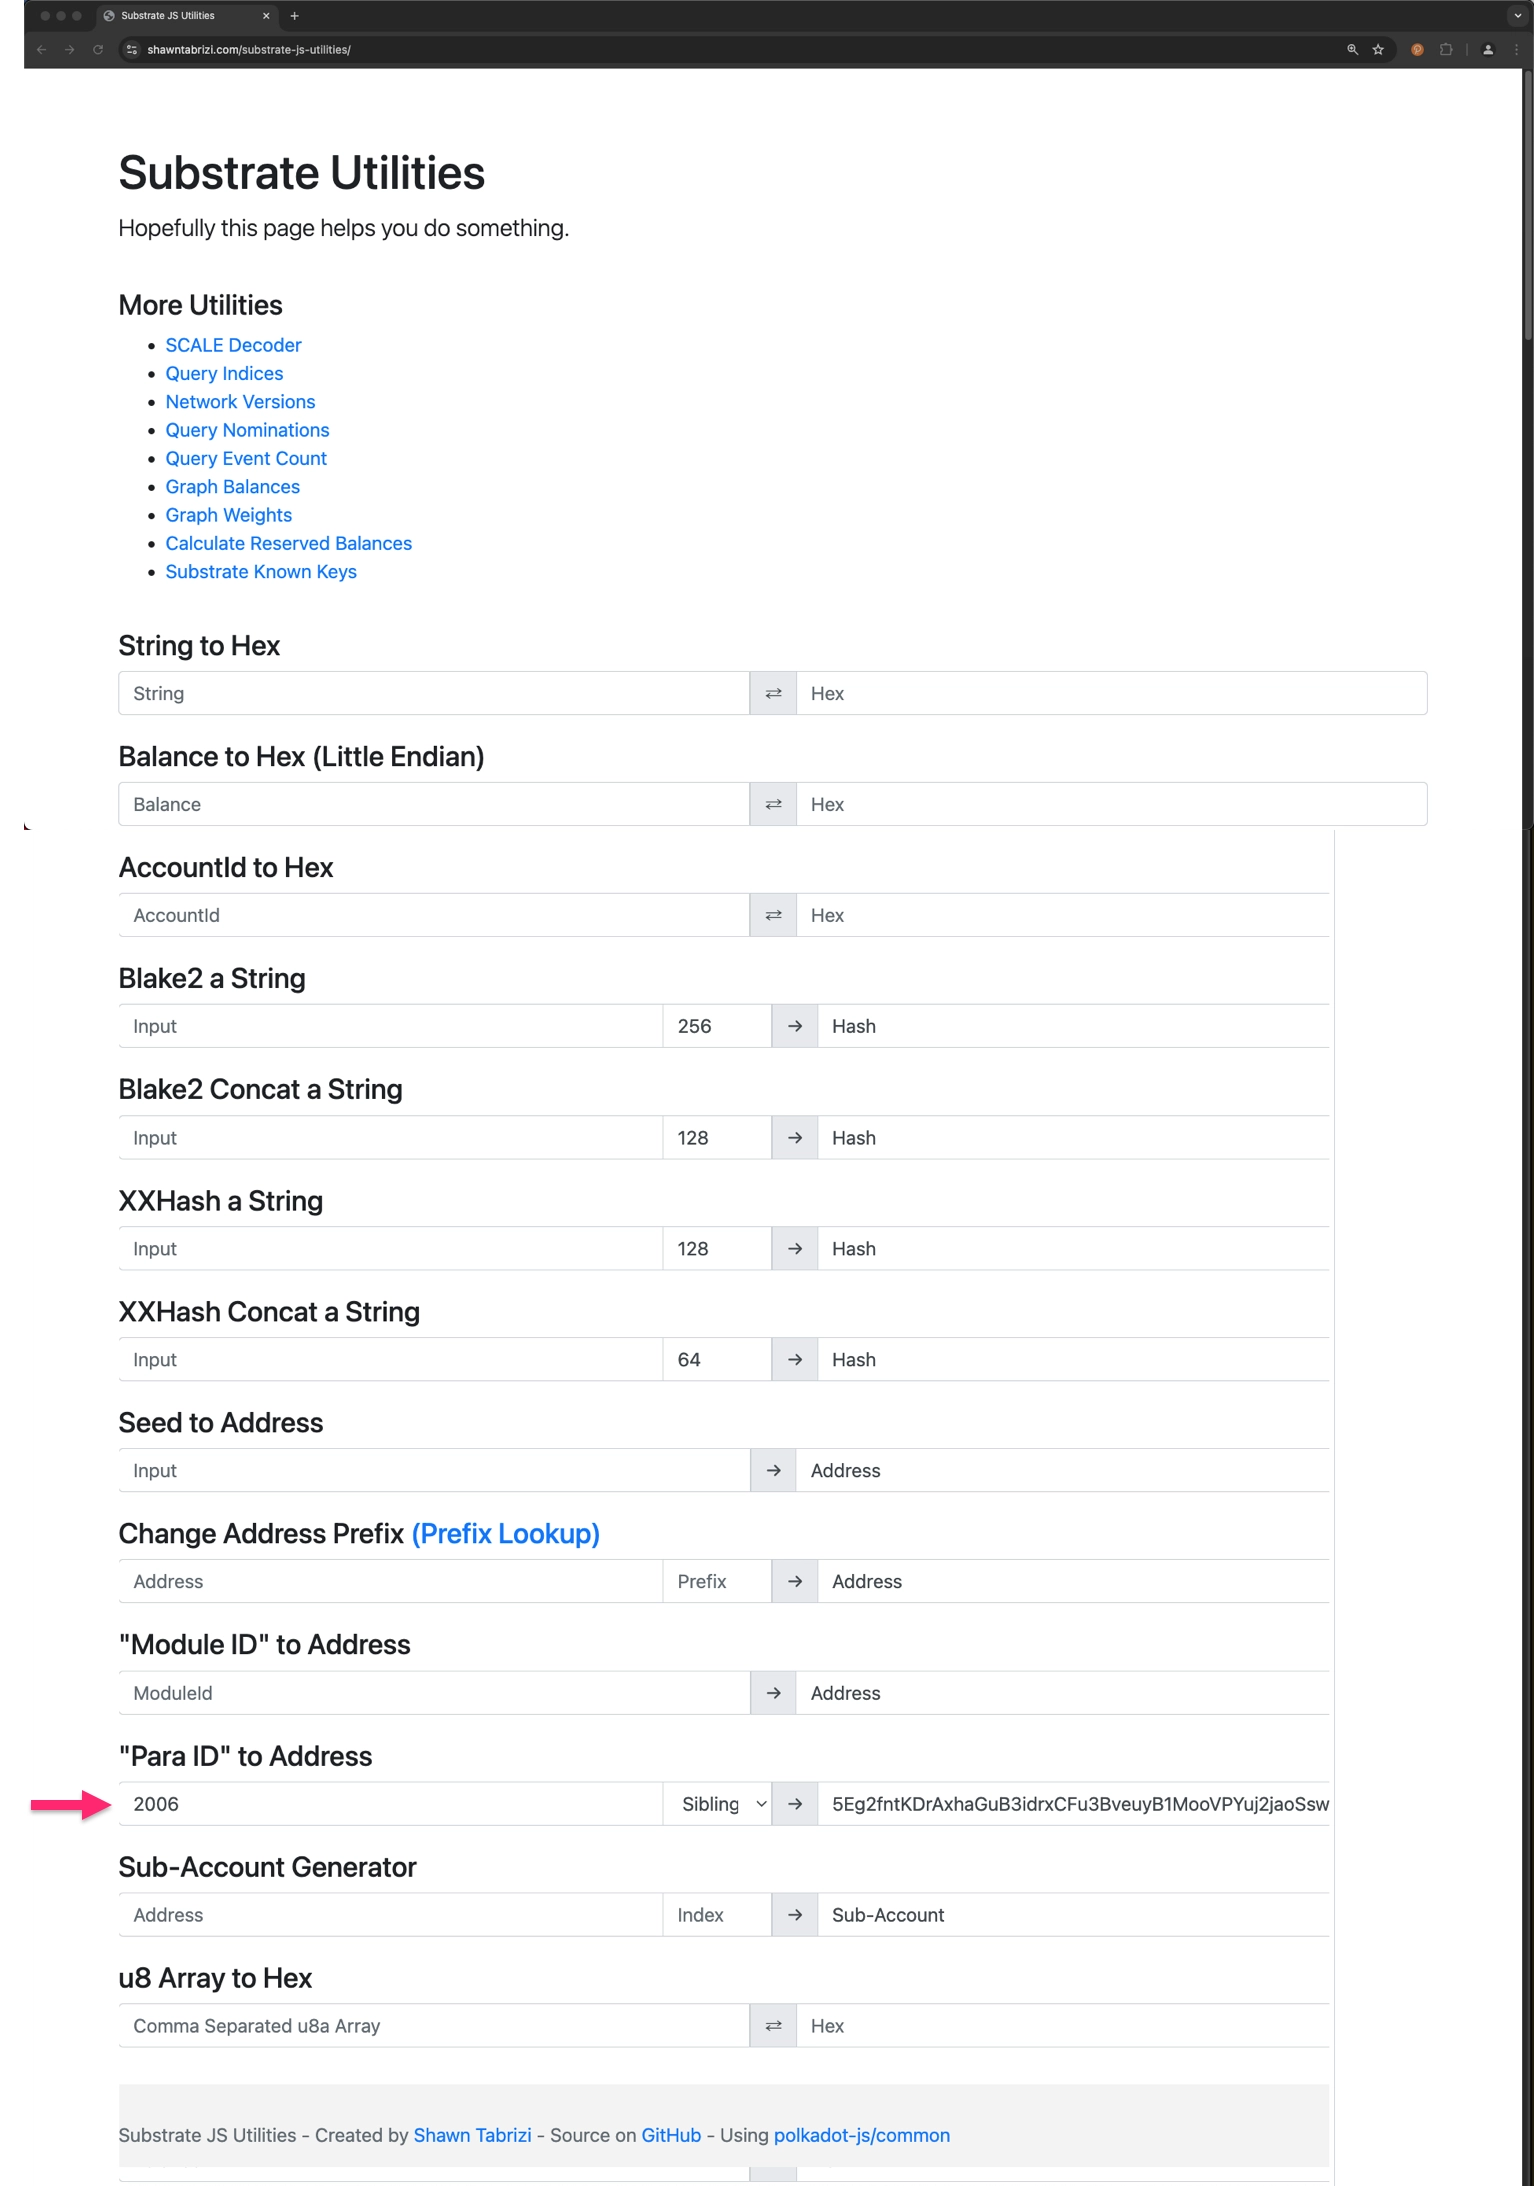
-
minBalance- the minimum balance required to hold this asset
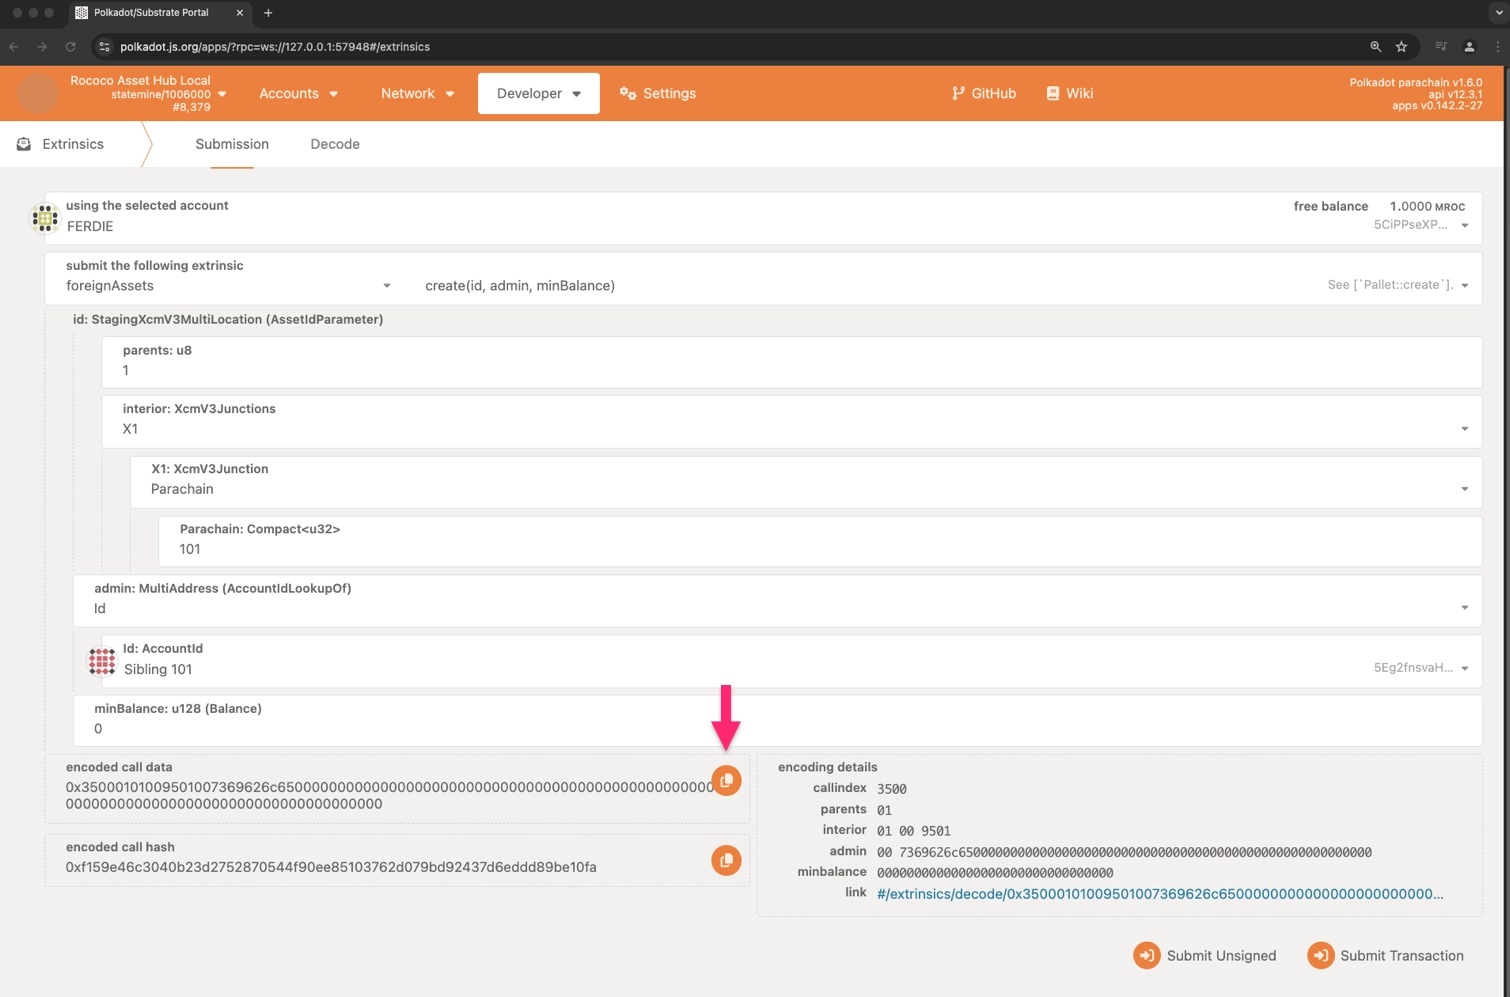
-
Source Parachain
- Navigate to the Developer > Extrinsics section
-
Create the extrinsic to register the foreign asset through XCM
- Paste the encoded call data copied in the previous step
- Click the Submit Transaction button
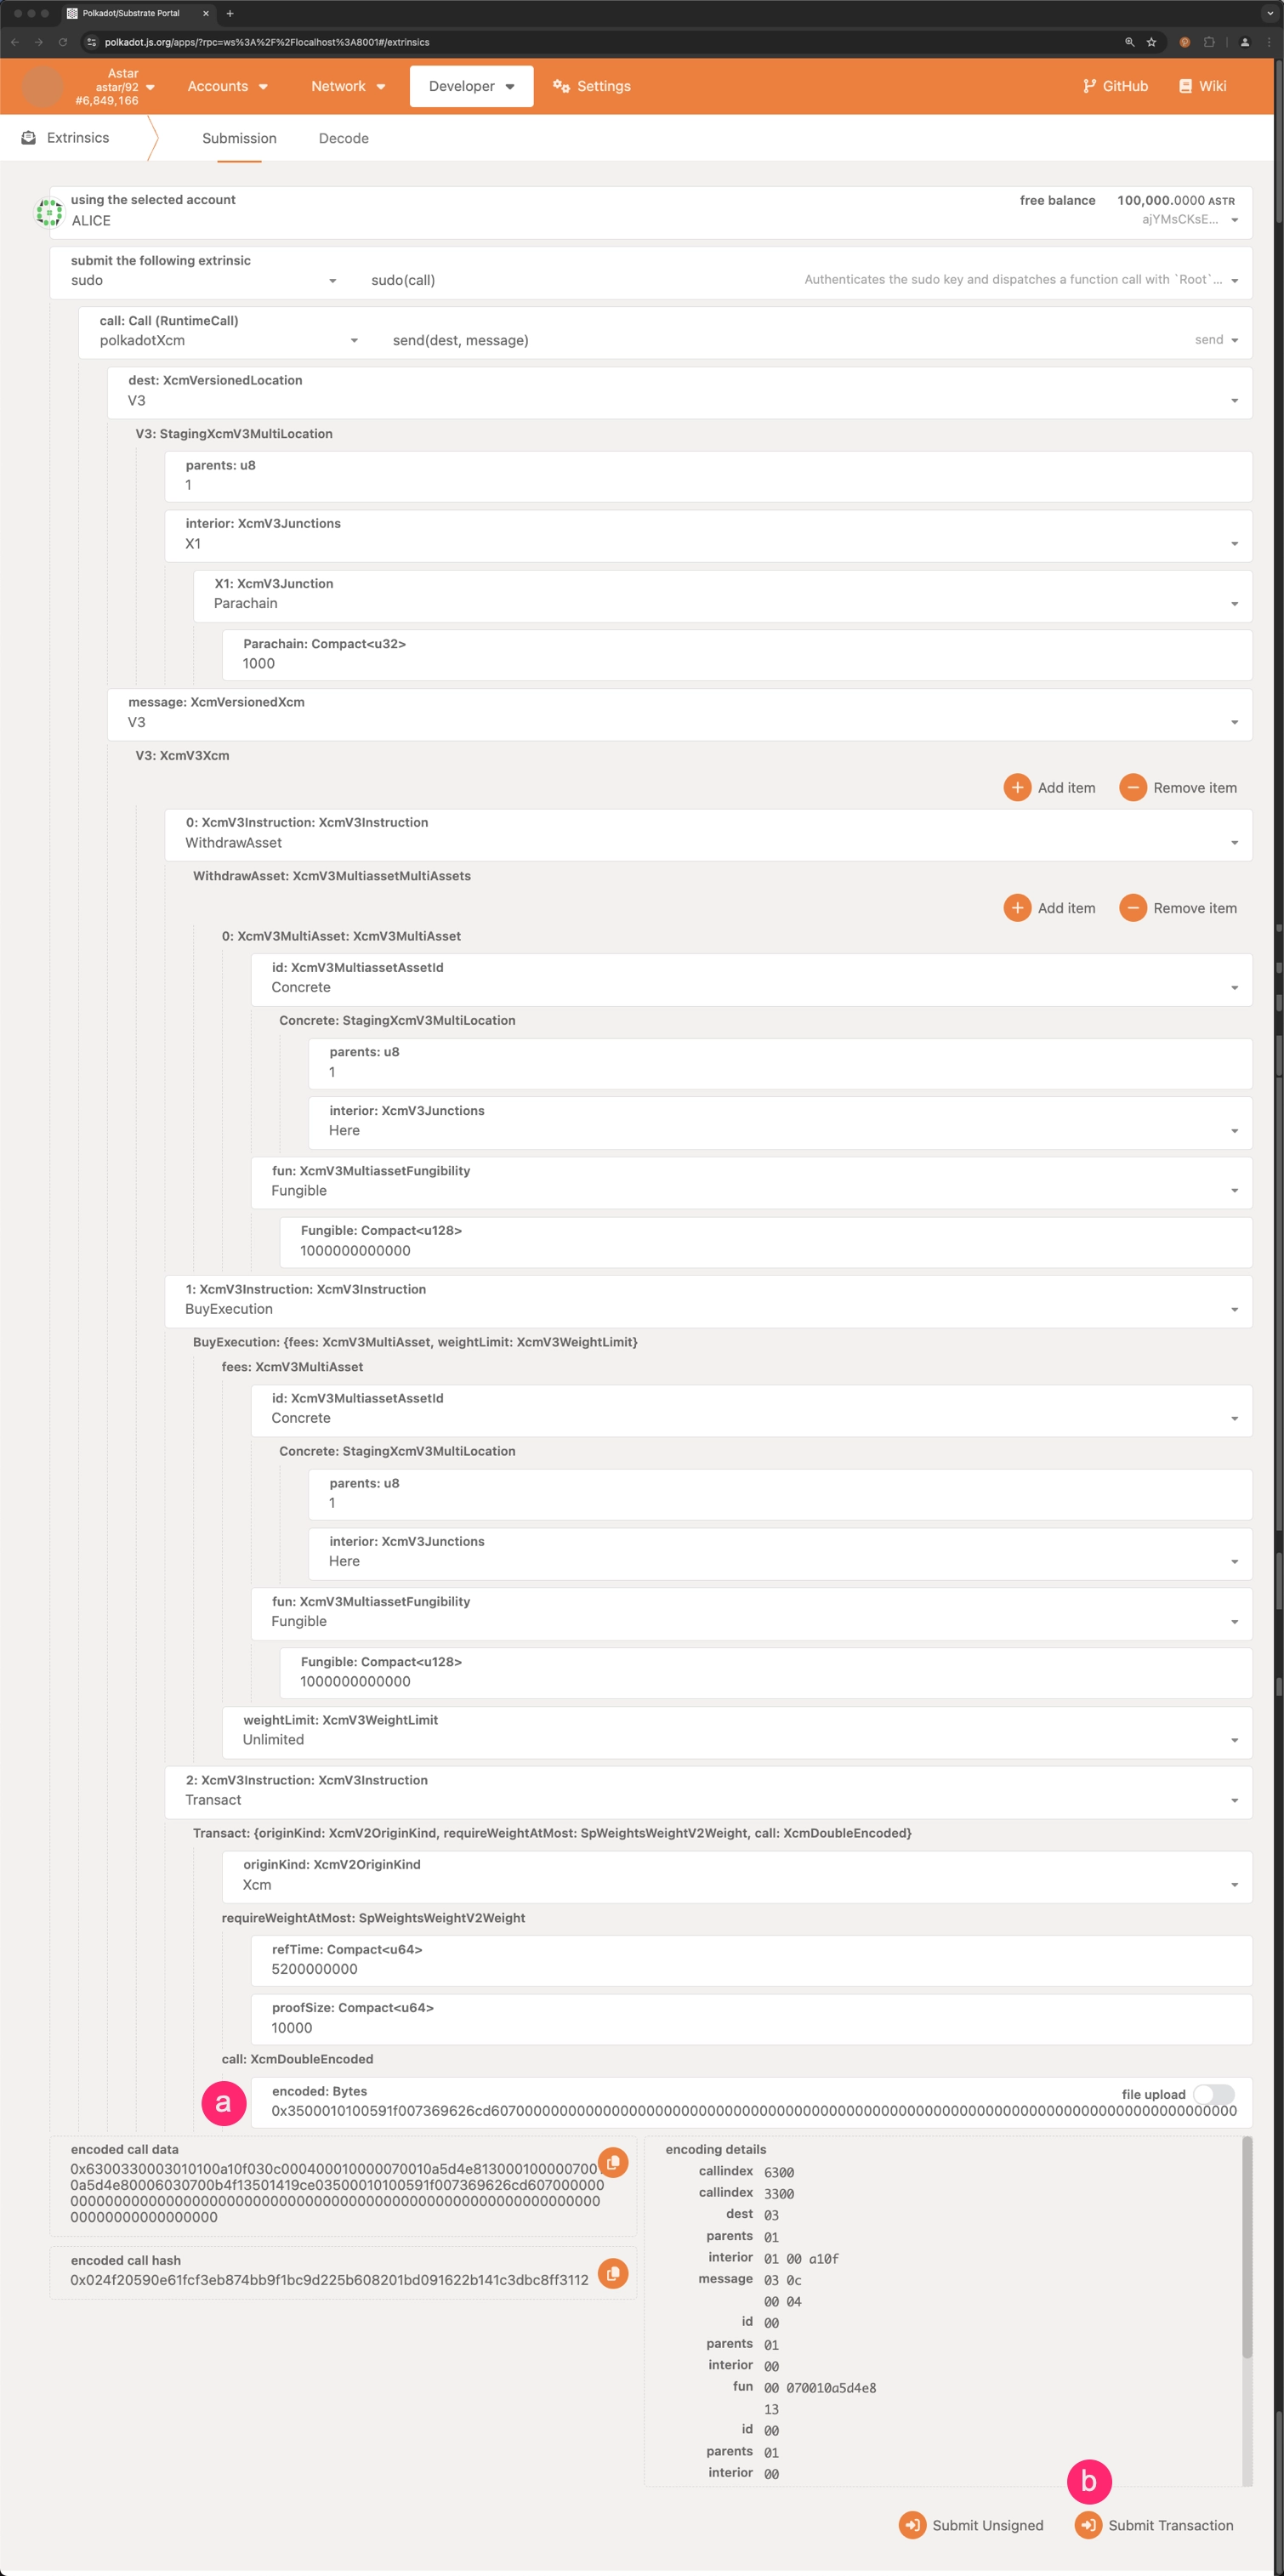
This XCM call involves withdrawing DOT from the sibling account of the parachain, using it to initiate an execution. The transaction will be carried out with XCM as the origin kind, and will be a hex-encoded call to create a foreign asset on Asset Hub for the specified parachain asset multilocation. Any surplus will be refunded, and the asset will be deposited into the sibling account.
Warning
Note that the sovereign account on the Asset Hub parachain must have a sufficient balance to cover the XCM
BuyExecutioninstruction. If the account does not have enough balance, the transaction will fail.Example of the encoded call data
If you want to have the whole XCM call ready to be copied, go to the Developer > Extrinsics > Decode section and paste the following hex-encoded call data:
0x6300330003010100a10f030c000400010000070010a5d4e81300010000070010a5d4e80006030700b4f13501419ce03500010100591f007369626cd607000000000000000000000000000000000000000000000000000000000000000000000000000000000000Ensure to replace the encoded call data with the one you copied in the previous step.
After the transaction is successfully executed, the foreign asset will be registered on the Asset Hub parachain.
Asset Registration Verification
To confirm that a foreign asset has been successfully accepted and registered on the Asset Hub parachain, you can navigate to the Network > Explorer section of the Polkadot.js Apps interface for Asset Hub. You should be able to see an event that includes the following details:
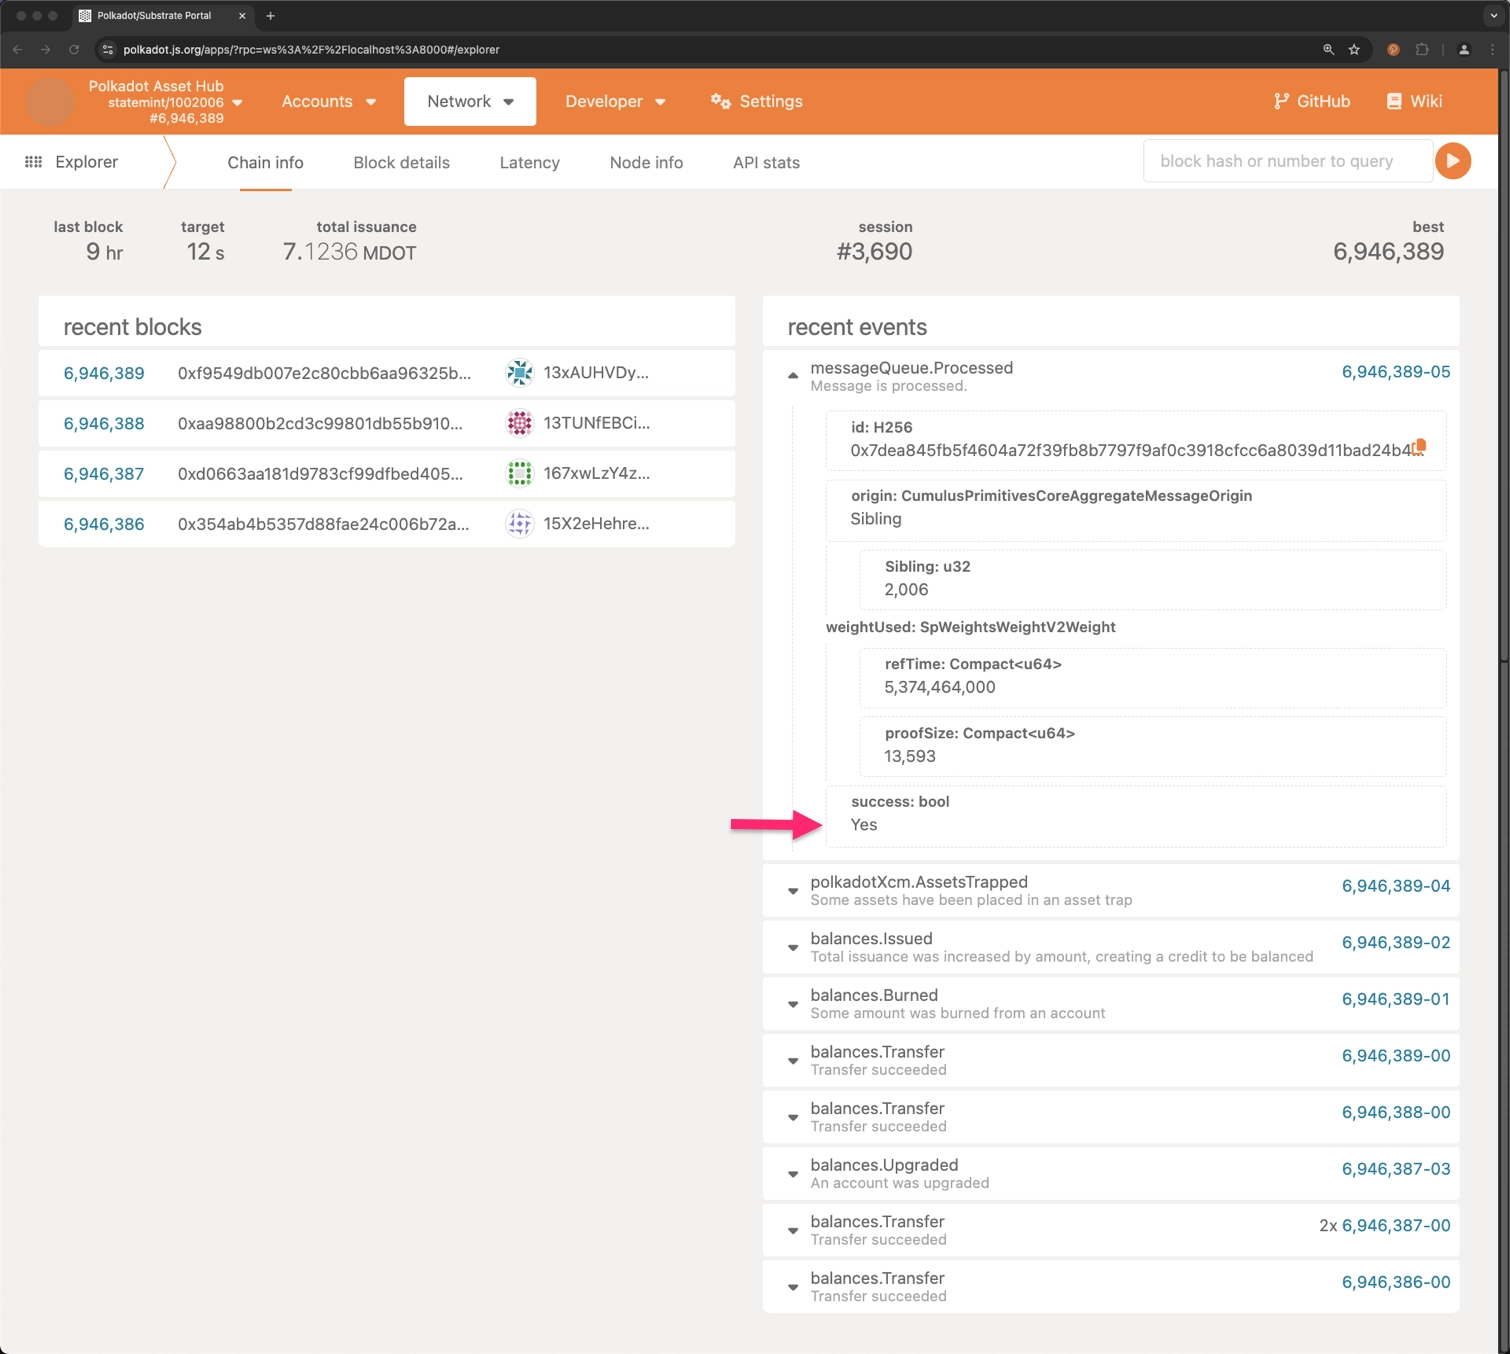
In the image above, the success field indicates whether the asset registration was successful.
Test Environment Setup
To test the foreign asset registration process before deploying it on a live network, you can set up a local parachain environment. This guide uses Chopsticks to simulate that process. For more information on using Chopsticks, please refer to the Chopsticks documentation.
To set up a test environment, run the following command:
Note
The above command will create a lazy fork of Polkadot as the relay chain, its Asset Hub instance, and the Astar parachain. The xcm parameter enables communication through the XCMP protocol between the relay chain and the parachains, allowing the registration of foreign assets on Asset Hub. For further information on the chopsticks usage of the XCMP protocol, refer to the XCM Testing section of the Chopsticks documentation.
After executing the command, the terminal will display the subsequent output:
[08:20:18.905] INFO: Loading config file https://raw.githubusercontent.com/AcalaNetwork/chopsticks/master/configs/polkadot-asset-hub.yml app: "chopsticks" [08:20:23.467] INFO: Polkadot Asset Hub RPC listening on port 8000 app: "chopsticks" app: "chopsticks" [08:20:23.467] INFO: Loading config file https://raw.githubusercontent.com/AcalaNetwork/chopsticks/master/configs/astar.yml app: "chopsticks" chopsticks::executor TRACE: Calling Metadata_metadata [08:20:27.936] INFO: Astar RPC listening on port 8001 app: "chopsticks" [08:20:28.956] INFO (xcm): Connected parachains [1000,2006] app: "chopsticks" [08:20:28.957] INFO: Loading config file https://raw.githubusercontent.com/AcalaNetwork/chopsticks/master/configs/polkadot.yml app: "chopsticks" chopsticks::executor TRACE: Calling Metadata_metadata chopsticks::executor TRACE: Completed Metadata_metadata [08:20:39.342] INFO: Polkadot RPC listening on port 8002 app: "chopsticks" chopsticks::executor TRACE: Calling Metadata_metadata chopsticks::executor TRACE: Completed Metadata_metadata chopsticks::executor TRACE: Calling BabeApi_configuration [08:20:50.231] INFO (xcm): Connected relaychain 'Polkadot' with parachain 'Polkadot Asset Hub' app: "chopsticks" chopsticks::executor TRACE: Calling BabeApi_configuration chopsticks::executor TRACE: Completed BabeApi_configuration
According to the output, the Polkadot relay chain, the Polkadot Asset Hub, and the Astar parachain are running locally and connected through XCM. They can be accessed via the Polkadot.js Apps interface: